Showing posts with label Birthday. Show all posts

Thursday, September 10, 2015

Glam, glitter, confetti and cake

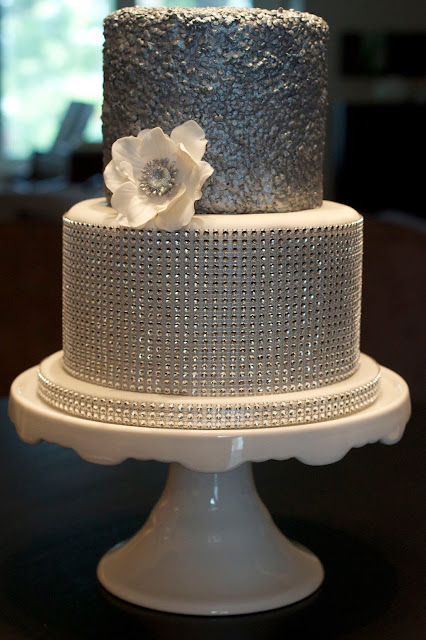
My sister-in-law recently celebrated a milestone birthday and I offered to make a cake for the occasion. My brother wasn't particularly helpful in the cake ideas department. I wanted to come up with something that reminded me of her and what she likes and I wanted the cake to be elegant and pretty since it was such as special birthday. I also had to keep in mind that I have a baby who naps for only 25 minutes at a time and thus it had to be relatively simple in design. We were getting her sparkly jewelry for a gift, so I thought I would make a cake to match. As they say, 'when in doubt, just add glitter'. 
It has been so long since I have made a cake that I actually had fondant go past the best before date (the Year of the Ram cake was red fondant). That never used to happen! I made a list of what I needed: white fondant - check!, silver glam ribbon - check!, edible silver dust - check!, cake board - check!, piping gel - check!, 5 pounds of candy confetti/sequins - check what?! That's right. I bought 5 pounds of sprinkles. To make the sequin top tier, I had no idea how many candy sequins I would need to cover the cake. I did not want to run out, and as I added up the small bottles of sprinkles, I realized that it would be most economical to buy a 5 pound package. Well, I only used a tiny fraction of the box. All subsequent family birthday cakes shall be covered in sprinkles. 
The one thing that I did run out of was edible silver dust for painting the colourful sprinkles. I bought two containers of silver dust which ended up being darker than I would have liked. I went over that with a 3rd container of lighter silver dust that I already had in my cake supply stash. Then I sent my husband to the store to get me some additional containers for touching up the next morning. Just a note to all who wish to make sparkly cakes: 'non-toxic' does not mean edible! My husband went to the store armed with this knowledge and it came in handy when the salesperson tried to sell him silver dust that said 'non-toxic' rather than edible. Disco dust, which is the really sparkly stuff used on the centre of the gumpaste flower on this cake is non-toxic but not really edible. So if you eat some of it, it's not a big deal but you should not cover an entire cake with it (unless you aren't going to eat the fondant). Okay, I'm done venting. 
So for the top tier, I covered the cake in fondant. Once set, I covered the fondant in piping gel and used my hand to cover the whole cake in candy sequins. Once that dried, I mixed the silver dust with vodka and painted the whole cake. At first, I made my paint too thick which is partly why I believe I ran out of silver dust too quickly. You want the paint to be thick enough to cover the coloured sprinkles but not so thick that you use an insane amount of petal dust. Once it dried, I touched up spots that still had multicolour sprinkles showing through. 
For the flower, I used an anemone cutter. I do not have a silicone mold kit to give lifelike texture to the petals so I just roughly used a veining tool. I did not try to make it look real - I just wanted it to have a little texture which is why the lines are so far apart. The centre is black gumpaste that I painted silver and covered with disco dust. The stamens were white and I painted them with silver dust mixed with vodka. One day it would be nice to actually try to make a realistic looking flower, like an open peony. The thought of having to put wire through petals without ripping them is a bit daunting though.
The bottom tier is covered in silver 'glam ribbon'. The ribbon is very easy to use. Just wash it with a bit of dish detergent, let it dry, cut to size, paint a bit of edible sugar glue onto the cake and attach! The only thing to be aware of is that if your cake is not straight, it is really going to show with this ribbon, so take the extra time to ensure your cake is level and your buttercream is straight on the sides of the cake. 
I loved the simplicity of this cake, even with all of the glam, glitter and confetti. I have 4 pounds and 15 ounces of candy sequins left. That's a lot of sprinkle type projects in the future...
Wednesday, February 18, 2015

Celebratory Layer Cakes!

I have disappeared for the last several months - almost eight months to be exact. Life has been busy and I have not had very much time for baking and blogging. I've been working, researching, organizing, purging, crocheting, singing and doing a little bit of baking here and there. I thought I would take some time to post a few of the cakes I did that I didn't get a chance to write about as I do not foresee a lot of time for blogging in the near future - more on that later in a couple of posts.

I had no idea what to call this post. What cake isn't 'celebratory'? These are two cakes that I did for family way back in May 2014. It has been so long that I'm not even 100% sure of what the flavour of the first one was. It definitely had something to do with almonds! I rarely do cakes that don't involve fondant decorations but I wanted to try some simpler but no less scrumptious looking cakes.

The first one was a Mother's Day cake - I know it doesn't look very Mother's Day-ish but really it was about the flavour. My mom doesn't like chocolate cake - although she has admitted to enjoying mocha cake with dulce de leche buttercream. I know she likes coffee flavour, so I made an almond flavoured butter cake with espresso based swiss meringue buttercream (I'm 98% sure that was the flavour) and garnished with toasted almonds. 


I was insistent that the almonds had to be sliced almonds but not blanched. Without the skin, they would just blend into the colour of the buttercream. They were a little harder to find but they look much better than blanched! 


The second cake was for my sister's birthday (same weekend!). I learned that my sister really enjoys chocolate malted milk balls and decided to run with that for a cake flavour. I wanted the cake to have the flavour of malted milk throughout and have a similar texture. 


I started out with a chocolate butter cake. For the crunchy texture found in a chocolate malted milk ball, I thought dacquoise would work well but it is a meringue that is traditionally made with nuts like hazelnuts or almonds and layered with buttercream or whipped cream and I did not want any nutty flavours overshadowing the malted milk flavour. I ended up making pseudo-dacquoise which was essentially large layers of chocolate meringue (piped in a large swirl) that I also added Ovaltine (original, not chocolate) powder to in place of some of the cocoa powder. The swiss meringue buttercream was chocolate with more Ovaltine added to it. I was worried that the Ovaltine might add a gritty texture to the smooth buttercream but it ended up being fine. The result was my cake version of a chocolate malted milk ball. It was very hard to cut into slices to serve but the flavour and texture was exactly what I wanted. 


I wanted the outside of the cake to be fun and birthday-like and you can't achieve that any better than with colourful sprinkles a-la-Sweetapolita. I originally did not plan to put the sprinkles that far up the cake but I got a little carried away - it just got higher and higher. You can never have enough sprinkles though. I decorated the top with large piped shells and chocolate malted milk balls. I must confess that I think I bought a pound of malt balls of which only 17 ended up on the actual cake and the rest ended up in my stomach - not all at once but they were gone much faster than I'd like to admit!


Thursday, June 26, 2014

Spring, I invoke thee!

Yes, it is summer now, but I made this cake before it was even spring. There was snow outside. I shudder at the memories. This was a birthday cake for my sister-in-law. She loves the super sugary frosting grocery store cakes and always asks for extra flowers on the cake. I decided to make my own version of a sugary flower cake. 
We had such a horrible winter everything was white, grey, brown and just dirty looking for too many months! I was ready for some vibrant spring/summer colours. 
I am not fabulous at piping flowers with frosting. I much prefer working with fondant or modelling paste. Personally I think that it is not only easier (for me anyway), but you can get much more creative with the types of flowers you can make. This blue ruffle flower below was made with several different sized circles of modelling paste. I thinned out and ruffled the edges using a stick tool with a tapered end. I then placed the layers one by one in a small bowl with the largest circle on the bottom and getting smaller as I got to the centre of the flower.
I used plunger cutters for the daisy type flowers. The make the centres, I took some brown modelling paste, pushed it through a strainer, scraped it off with a knife and then used a circle cutter.
I also made ribbon roses which I think are really cute. The thick, puffy look is a nice contrast to the thin ruffled flowers.
I used a 5-petal flower cutter to make the other flowers - I don't even really know what to call them since they aren't modelled after anything real.
Since my sister-in-law enjoys sugary frosting, rather than just simply icing the cake, I decided to pipe ruffles around the cake for a maximum frosting to cake ratio. I used a rose petal tip (#104) to make the alternating shades of green ruffles. I had a bit of trouble when I got to the top edge and turned the tip the wrong way around prematurely but the overall effect is still there. 
The cake of course was vanilla with vanilla frosting - no shortening used in this 'grocery store' cake though. Just lots and lots of butter!


Monday, December 30, 2013

Peonies and piping

It was about two and a half months before I made another cake after the one that I dropped. I wasn't necessarily discouraged. It's more a lack of time. Less than a week after the cake disaster, we hopped on a plane to Europe and spent a fabulous two and a half weeks in Paris, Edinburgh, Aberlour, Castle Combe and London. Two and a half weeks was fabulous but it wasn't enough time to get through all of the gorgeous pastries that I wanted to try. After that, I really had to focus on my graduate studies. Before I knew it, it was already November and my mother's birthday. 

I wanted to take the opportunity to practice a couple of skills - flowers and piping. I had seen quite a few beautiful wedding cakes with lace-like piped pattern and wanted to give it a try. There were a lot of very similar cakes and I wondered if there was some sort of template out there or if people were just piping the design freehand. I perused a couple of cake decorating stores and could not seem to find any templates so I decided to just give it a shot on my own. The flower shape I used for the lace is a dogwood flower. I bought some very fine decorating tips - size 0 and 00 to do the intricate lines. When I got started I realized that those tips were just too small for me to work with on a cake. Since I moved a size up for the smaller tips, I unfortunately did not have tips large enough for the thicker lines and ended up just cutting a hole in the end of a disposable piping bag. It wasn't ideal but it worked. From far away, the piping looks neat enough. It was not as smooth as I would have liked close up. One of the tools that I find extremely helpful when piping royal icing or doing stringwork is this yellow spatula-pick thingy. It is absolutely fabulous for scraping off mistakes or broken lines. I don't actually know the real name for this tool but 'Boo-boo stick' seems appropriate given it's most useful function. 
I've only attempted one peony-like flower before. I like them because they still look very pretty if not terribly realistic or accurate. There are lots of tutorials online. There are also a few different styles of peony cutters. I used this one. I did the veining of each petal by hand using a gumpaste veining tool. It was tempting to purchase a silicone mold kit but they are quite expensive and at the rate I'm making cakes right now, I might make one peony a year. I think I liked the overall shape of this peony better than my previous attempt. I left it more open at the bottom so I didn't need any filler petals when I placed it on the cake. I still ended up having it quite condensed in the centre and would like to try again to make it even more open. 
The flavour of the cake was coconut and it was filled with pineapple swiss meringue buttercream. To make the coconut cake, I took my favourite vanilla cake recipe and switched out the milk for coconut milk. I also pulsed some unsweetened dried coconut in the food processor and added it to the dry ingredients. I added a bit of coconut extract to the simple syrup but found that it smelled really artificial so I made another batch of simple syrup and added only one drop of extract. It was a little better. 
For the pineapple buttercream, I used canned pineapple chunks along with the juices to make a pineapple reduction. I pureed the pineapple reduction and added it to the buttercream. It was a subtle flavour but nice. 

The one that got away...

I debated whether to write about this cake that I did back in August for my niece's first birthday because the outcome was less than optimal. The purpose of my blog is to write and share my hobby with others and that includes projects or situations that may be a challenge or that may not be a success. This is one such project.  
One may look at the picture above and wonder what the challenges might have been. Overall it's a pretty cake. My sister-in-law wanted something pink and girly and suggested an ombré cake. She doesn't like fondant very much so I did a frosting-covered layer on the bottom and a fondant-covered layer for the top.  
The ruffled flower was made by cutting about 1-inch wide strips of thinly rolled modelling paste and rolling a modelling stick back and forth along the edges to create a ruffled effect. I was a bit short on time to make this cake as I had been working late and getting ready for a trip overseas. The flower ended up being a tad off-centre. In retrospect I should have been taking a step back to look at the cake after each flower layer to ensure that it was straight or in addition to marking the cake for the outer edge of the flower I could have also marked the centre of the flower. This would have not required a significant amount of extra time and would have ensured a straighter flower. Alas, that wasn't the suboptimal part of this cake project. 
For the ombré rosettes, I used a fairly large star tip. I portioned out just under a third of my batch of frosting and tinted it dark pink. For the next shade of pink, I just added white frosting to the leftover dark pink to get a lighter shade and then repeated for the lightest colour pink. This part was decently problem-free with the exception of some of the edges not being very neat. 
I placed the cake on a fondant-covered board as I usually do, and was annoyed that I managed to get a fingerprint on one side of the board near the front. The cake was placed off-centre to allow room for my niece's name. 

Like many of my other cakes, I placed the board on a cake stand to photograph it. Sometimes to get a good angle, I move the cake around on the table, sometimes I stand on my tiptoes, sometimes I stand on a chair. I had really gotten all of the photos that I needed and then I thought, 'ah, just one more'. I moved the cake stand back to get a better angle. Since I had placed the cake off-centre on the board, the centre of gravity was toward the back. As I pushed the cake stand back, the cake slipped off of the cake stand, and I'm not sure if I froze but everything really did feel like slow motion. The cake slipped onto the table, then slid off of the table and onto the floor. Surprisingly the cake landed upright however the impact of the fall caused the cake to collapse. It was not salvageable. This was not a reality tv show or a bakery where there might be extra staff, buttercream/frosting lying around, extra fondant, extra sponge cake. I had nothing. My husband held me while I sobbed. And then I went into panic mode. There was an hour until the party started but it would take an hour to get there. I thought that maybe I could make another cake and get it there by the time people had finished eating. I sent my husband to the grocery store to get more butter. I called my sister for reinforcements. I turned on the oven to preheat. As I watched the oven climb slowly in temperature, I came to the realization that it would be impossible. I called my husband and told him to forget the butter. I called my sister to tell her not to bother coming over. My husband called his sister to tell her what had happened. I felt awful on the way to the party. I felt awful when I arrived at the party and my niece was wearing a dress that matched the destroyed cake perfectly. It didn't take too long for me to be able to laugh a little about it and thankfully the cake was for family and they were very understanding.

I don't really have a moral to this story. As I am just a hobbyist, it is unrealistic for me to have extra cakes on hand in case something like this happens. Perhaps don't place cakes off-centre on cake boards or be extra careful while taking photos. In the grand scheme of things, it's just a cake. Although if you've ever watched Kings of Pastry, don't tell the MOF hopefuls that it's just sugar. In the end, I was there to celebrate the first year of a wonderful, beautiful, healthy little girl. 

Thursday, October 17, 2013

"There's a hair on this cake"

When I was in the midst of making this cake back in July for my brother-in-law's birthday, I had no intention of posting it on my blog. I wasn't quite sure how it was going to turn out as I have only done two carved cakes before and the subject matter was a little, shall we say, inelegant. 
Let me give a little bit of context to this cake. Back in May, I bought my sister a birthday card on which there was a rather hairy lad posing with barely there cutoff shorts and on the inside of the card it said something along the lines of "see, there are worse things than getting older." My sister's husband thought the card was rather gross and based on his reaction, I had decided to make this cheeky cake for his birthday. 


The three photos on the left were taken with my iPhone as I was making the cake to keep my sister up to date on progress, but I thought that I would include them to show how it was made. Each 'cheek' was made from two 6" round cakes that were about 1.5 to 2 inches high and I used two 9x13" cakes that were about 1 to 1.5" high for the lower back and legs. Prior to carving the cake, I had sketched the general shape out onto freezer paper and used this as a template. I filled and stacked the cakes and placed them in the fridge for the buttercream to harden. I trimmed the general shape of the cheeks and then placed the lower back and legs pieces together with the cheeks. Once it was together, I carved the shape of the cheeks to fit with the body. After I was pleased with the shape, I crumb-coated the whole thing in buttercream and placed it in the fridge to set. 

Now, typically I cover my boards in fondant as it provides a much more finished look to your overall cake. It is a bit of a pet peeve of mine to see an amazingly executed cake on a foil board when I know that cake would have taken many, many hours to make and it would have only been an extra few minutes to cover the board in fondant. In this case, since the cake was a joke for my family, and I hadn't planned to post photos and I wasn't 100% confident it would turn out, I did not cover my board and carved the cake directly on the board. If you were to cover your board in fondant, you would need to cut out a cardboard cake board to the shape of the cake, carve and cover your cake on that, and then carefully transfer the cake to the finished fondant-covered board. 

Once the buttercream was set, it was ready to be covered in flesh-coloured fondant. I have to say that it was quite humourous smoothing the fondant on this cake as I had to use my hands primarily versus a fondant smoother. I used a bulbulous cone modelling tool and dogbone tool to define the cheeks and the legs.

To create some of the hair, I used very fine pieces of brown gumpaste and carefully placed these in the fondant before the fondant dried. As you can see in the picture, due to the difference in temperature between the cold buttercream and the humid July weather, the fondant started to 'sweat' a little (how appropriate). Sweaty fondant is not really a big deal. Just don't touch it and it will dry just fine. 


I used a stitching tool and veining tool for the details on the cutoff jean shorts. I used a bit of dark yellow petal dust to simulate yellow stitching on the jeans. I wish I had purchased a few different shades of blue petal dust to add some more depth to the denim. The frayed edges were made using an extruder and a few different shades of blue.


The rest of the hair was added using brown edible marker. Now from the carving pictures above, I don't need to tell you that the cake wasn't chocolate. Somehow that just seemed like it would be going a bit too far and I was certain that no one would want to eat a chocolate cake if they got past the sight of the external appearance. The cake was vanilla and the swiss meringue buttercream was banana cream flavour.


The cake was quite a surprise. My brother-in-law had guessed that I had made him a basketball-themed cake. He was a good sport about it and we got some memorable photos of the occasion. I feel like I should make some form of butt pun for the end of this post but I shall refrain. My next post should be along shortly as I'm not sure how long I want this to be the first thing people see when visiting my blog!

Monday, October 14, 2013

An elephant-themed first birthday cake

It has been almost 3 months since my last post. I have done some baking within that time but I haven't had the time to sort through photos and write about them. I am hoping to complete my MSc within the next year so I've been really scaling down on the baking projects. I do certainly miss it as a creative outlet but I'll get back to it soon enough. In the meantime, I will be posting a few projects that I had done in the summer. 

This was an elephant-themed birthday cake for the first birthday of a friend's son that I made back in July. I apologize for the grainy photo quality. I didn't check the settings on the camera before I started taking photos so I didn't notice that the ISO had been set really high. 


My friend really liked the elephant cake that I did for a baby shower back in March. The birthday boy's favourite colour is yellow and we thought that brown would be a nice contrast colour. I wanted to make the cake a little different from the other elephant and decided to do a 3-dimensional elephant instead. 
I've made 3-D animals in the past and they usually consist of a separate body, limbs and head. For this cake I wanted to keep the "Republican" elephant shape, meaning that it had to be formed with one piece of fondant. It was harder than I thought to manipulate the one piece of fondant into the desired shape, particularly with the trunk. The fondant that I use dries rather quickly and it was mixed with tylose for stability, so I really had to work fast. It took a couple of tries before I was satisfied with the shape. In retrospect, I wonder if it would have been easier to use modelling chocolate as it is easier to manipulate without seams and wrinkles. 


The balloon was made from gumpaste for fast drying and attached to floral wire. I had to make the balloon fairly thin as the floral wire was a higher gauge (thinner) and I wanted it to be able to support the balloon without putting any weight on the elephant's trunk. In the future I will keep some heavier gauge floral wire on hand. 


I wrote the birthday boy's name out on little modelling paste circus flags and used an extruder for the fondant 'string' and bows. 


The flavour was a rich chocolate cake with raspberry swiss meringue buttercream. For the buttercream I used thawed frozen raspberries, pureed them and then strained them for a fine mesh sieve to get rid of all of the seeds. It was a subtle raspberry flavour. If you want a more concentrated flavour you could probably reduce the puree on the stove and allow to cool before adding it to the buttercream. 

Saturday, May 18, 2013

A despicably pretty minion cake

This cake has a bit of a history. Since seeing the movie Despicable Me, I really wanted to make a minion cake because they are just so darn cute and I love cute things. My youngest nephew's birthday is in December and last summer my sister tried to show him multiple Despicable Me videos to convince him that he wanted a minion cake for his birthday. He ended up wanting a Michael Jackson Thriller werewolf cake, which he got. He is already planning his cake for next year - something to do withe Harry Potter and Spiderman. He said to me "Aunt 'Deece' (which is how he says my name) you can have funny little yellow guy for your birthday." I didn't do a decorated cake for my birthday or my husband's birthday this year - I did an apple cake with butterscotch cream cheese frosting and a banana chocolate chip toffee cake with bourbon frosting and chocolate ganache. They were delicious but did not fill the 'funny little yellow guy' quota. Someone in my family was going to get a minion cake. It was only a matter of time. Next family birthday - my sister. I thought it would be a great cake for my sister as a reminder that she really needs to work on her cake idea brainwashing skills with her kids. 
The cake design in itself was not overly complicated. It's basically a yellow cylinder. It did require some structural support though and some cake carving skills to get a symmetrical domed top. The cake was six 6-inch layers of almond butter cake filled with strawberry swiss meringue buttercream. I used a plastic centre dowel when stacking the cakes to ensure that it wasn't a leaning minion in the end. Once the cake was all stacked, filled and crumb coated, it measured about 8 inches tall. 
The main challenge of the cake was covering such a tall and narrow cake with fondant without tearing and creasing or pleating. I am not sure what the proper technique for covering a tall cake is but what I did managed to work well. I rolled out my circle of fondant a couple of inches smaller than what it should have been for a normal cake knowing that the fondant was going to stretch quite a bit as I smoothed the fondant against the cake to get out any pleats or folds. The other part is that knowing it was going to stretch and therefore be susceptible to tearing, I rolled my fondant thicker than usual. Normally I roll my fondant about 3/8" thick or slightly thinner and this time I rolled my fondant 1/4" thick. The last component: you have to work very fast! As the fondant dries (which depending on which brand you use can be very fast) it becomes more difficult to smooth out any folds without leaving marks on the cake. I ended up with one very small tear at the very bottom of the cake which wasn't such a big deal since it was being covered with a dress. 


I looked at several pictures of minions to decide what facial expression I wanted. They also vary a little bit in hairstyles. I went with a little bit of hair scattered evenly over the top of the head. The hair was made from gumpaste. I let it dry overnight and then placed it into the scalp right after covering the cake with fondant while the fondant was still very soft. I made quite a few extra pieces of hair accounting for possible breakage. I used a daisy cutter/plunger for the little hair accessory.
For the mouth I used a ball tool to indent the shape of the mouth while the fondant was still soft. This resulted in cleaner edge than if I had cut out the shape of the mouth. I then spread a very thin strip of purple fondant in the indented area and filled it with uneven looking teeth. 

Now I know that a pink dress is not the typical outfit for a minion - they are typically wearing blue overalls unless they are in disguise trying to get a stuffed toy unicorn from a toy store, or cleaning as a French maid. I decided that seeing as how the cake was for my sister and it was also Mother's Day weekend, I would do something spring-like and feminine. I wanted to keep the dress in a similar style to the overalls they wear. I first wrapped a skirt around the minion creating folds for pleats as I went around the body. I cut out a rectangular piece for the front and then strips for the waistband. I used a stitching tool to create the look of seams on the dress. 
Since the cake was celebrating my sister's birthday, I thought it was only appropriate to have the minion celebrating with a cupcake. It was also a very logical place to stick a birthday candle.
My youngest nephew spent a lot of time staring at this cake. My sister said to him, "See, don't you want a little funny yellow guy for your birthday?" My nephew replies, "Yes, and I want Harry Potter, and Spider Man...." I think we should just quit while we're ahead and stop asking him about his cake for next December. If we don't, I'm going to end up making ten different cakes for one birthday.

I had a great time making this cake. People often ask if it is heartbreaking to cut into a cake that I've spent so many hours making and my response is typically 'no'. This cake was not the most time consuming cake that I've done but I think it was the hardest one to cut into. I wanted to keep it, like a stuffed toy. Thank goodness for a blog to document the memories!

Thursday, April 25, 2013

A collage of cupcakes

My husband recently mentioned to me that my life is a little like a sitcom. I say 'yes' to everything and then hope it all comes together. I somehow manage to jump from adventure to adventure and it all works out in the end. This is probably not good for the sanity of myself nor those around me and is generally a flawed philosophy for life. 
I also can't keep things simple. I think 'Fifty cupcakes? A variety of themes? No problem. I'll do a few 3-dimensional decorations and the rest will be simple 2-dimensional decorations. Tah dah!' And then as I start to make things, I think to myself, '2-dimensional is no fun! I want to make cuter things!' And then halfway through the week, I have bags under my eyes, I clutch my decoration to-do list on the subway and revise my plan of attack on my way home from work each day. I think to myself, ' I need a baking break' and then I somehow finish the cupcakes, I am thrilled with them and think 'wow, I should do this again soon!'. This is the story of my life. Actually below is the story of someone else's life - in cupcake form! 


I was told a few things about the guest of honour: He likes a particular business organization, cycling, tools and food. For the business aspect, I did a couple of books titled 'The Art of Business' and a couple of business shirts and ties. I made some simple bicycles for the cycling.


I think I had the most fun making the tools and the food. I had done several of the tools before when making construction-themed cupcakes. This time I also made hand saws, wrench and nuts, and screwdrivers in addition to the drill, measuring tape, square and pencil, and my favourite, the X-acto knife. 


I tried to make a variety of foods to go on the cupcakes. These toppers involved a lot of different colours and a lot of small details which meant a lot of work for my finger muscles! On a couple of mornings, I was convinced that I was developing arthritis in my hands. 


No birthday would be complete without cake (or I suppose cupcakes in this case) and I couldn't resist putting a piece of a cake on top of cake. I have an appreciation for redundancy. My husband would call it recursion. Geek. 


Following along with sweet foods, I made a few little donuts with sprinkles. Who doesn't love desserts with sprinkles? Doesn't it make you feel happy, young and carefree? I felt slightly carefree while making these donuts, and then I looked at my decorating to do list and it brought me back to reality. 


I made quite a few fast food items including hot dogs, hamburger and fries, pizza and fish and chips. The fish and chips was one of my favourites and I included the peas in a ramekin (as they do at our favourite pub) which I usually push to the side because I hate peas. I've really tried to like them. I even have a t-shirt that says 'Give peas a chance'. I'll stick with the fondant ones, thank you. 

I was also happy with how the hamburger turned out. This one had lettuce, cheddar cheese and tomato slices. I also made little fondant sesame seeds. 
I included some stereotypical 'guy' foods like barbecue stuff and steak. I included peas with the steak. I don't know if that's a real thing. I suppose the healthcare professional side of me was thinking, 'That's a really big piece of meat. It needs some vegetables and fries don't count!'


My other favourite food (in true form and fondant form) is sushi and maki. This maki is made with fondant cucumber, crab, avocado and rice. Each rice grain was rolled by hand to taper the ends (because I have an abundance of extra time OCD). 
Group shot! Although there were a few distinct themes for this cupcake collage, overall they worked well together. The cupcake flavours were vanilla/vanilla, vanilla/chocolate, chocolate/chocolate, chocolate/vanilla and red velvet with cream cheese frosting. 

Okay, one more group shot. I couldn't decide which photo I liked better.
Next cake project will be something simple but delicious! We'll see if it's blog worthy and if I'm able to get photos before it's gobbled up.