Showing posts with label Character. Show all posts

Saturday, May 18, 2013

A despicably pretty minion cake

This cake has a bit of a history. Since seeing the movie Despicable Me, I really wanted to make a minion cake because they are just so darn cute and I love cute things. My youngest nephew's birthday is in December and last summer my sister tried to show him multiple Despicable Me videos to convince him that he wanted a minion cake for his birthday. He ended up wanting a Michael Jackson Thriller werewolf cake, which he got. He is already planning his cake for next year - something to do withe Harry Potter and Spiderman. He said to me "Aunt 'Deece' (which is how he says my name) you can have funny little yellow guy for your birthday." I didn't do a decorated cake for my birthday or my husband's birthday this year - I did an apple cake with butterscotch cream cheese frosting and a banana chocolate chip toffee cake with bourbon frosting and chocolate ganache. They were delicious but did not fill the 'funny little yellow guy' quota. Someone in my family was going to get a minion cake. It was only a matter of time. Next family birthday - my sister. I thought it would be a great cake for my sister as a reminder that she really needs to work on her cake idea brainwashing skills with her kids. 
The cake design in itself was not overly complicated. It's basically a yellow cylinder. It did require some structural support though and some cake carving skills to get a symmetrical domed top. The cake was six 6-inch layers of almond butter cake filled with strawberry swiss meringue buttercream. I used a plastic centre dowel when stacking the cakes to ensure that it wasn't a leaning minion in the end. Once the cake was all stacked, filled and crumb coated, it measured about 8 inches tall. 
The main challenge of the cake was covering such a tall and narrow cake with fondant without tearing and creasing or pleating. I am not sure what the proper technique for covering a tall cake is but what I did managed to work well. I rolled out my circle of fondant a couple of inches smaller than what it should have been for a normal cake knowing that the fondant was going to stretch quite a bit as I smoothed the fondant against the cake to get out any pleats or folds. The other part is that knowing it was going to stretch and therefore be susceptible to tearing, I rolled my fondant thicker than usual. Normally I roll my fondant about 3/8" thick or slightly thinner and this time I rolled my fondant 1/4" thick. The last component: you have to work very fast! As the fondant dries (which depending on which brand you use can be very fast) it becomes more difficult to smooth out any folds without leaving marks on the cake. I ended up with one very small tear at the very bottom of the cake which wasn't such a big deal since it was being covered with a dress. 


I looked at several pictures of minions to decide what facial expression I wanted. They also vary a little bit in hairstyles. I went with a little bit of hair scattered evenly over the top of the head. The hair was made from gumpaste. I let it dry overnight and then placed it into the scalp right after covering the cake with fondant while the fondant was still very soft. I made quite a few extra pieces of hair accounting for possible breakage. I used a daisy cutter/plunger for the little hair accessory.
For the mouth I used a ball tool to indent the shape of the mouth while the fondant was still soft. This resulted in cleaner edge than if I had cut out the shape of the mouth. I then spread a very thin strip of purple fondant in the indented area and filled it with uneven looking teeth. 

Now I know that a pink dress is not the typical outfit for a minion - they are typically wearing blue overalls unless they are in disguise trying to get a stuffed toy unicorn from a toy store, or cleaning as a French maid. I decided that seeing as how the cake was for my sister and it was also Mother's Day weekend, I would do something spring-like and feminine. I wanted to keep the dress in a similar style to the overalls they wear. I first wrapped a skirt around the minion creating folds for pleats as I went around the body. I cut out a rectangular piece for the front and then strips for the waistband. I used a stitching tool to create the look of seams on the dress. 
Since the cake was celebrating my sister's birthday, I thought it was only appropriate to have the minion celebrating with a cupcake. It was also a very logical place to stick a birthday candle.
My youngest nephew spent a lot of time staring at this cake. My sister said to him, "See, don't you want a little funny yellow guy for your birthday?" My nephew replies, "Yes, and I want Harry Potter, and Spider Man...." I think we should just quit while we're ahead and stop asking him about his cake for next December. If we don't, I'm going to end up making ten different cakes for one birthday.

I had a great time making this cake. People often ask if it is heartbreaking to cut into a cake that I've spent so many hours making and my response is typically 'no'. This cake was not the most time consuming cake that I've done but I think it was the hardest one to cut into. I wanted to keep it, like a stuffed toy. Thank goodness for a blog to document the memories!

Wednesday, February 06, 2013

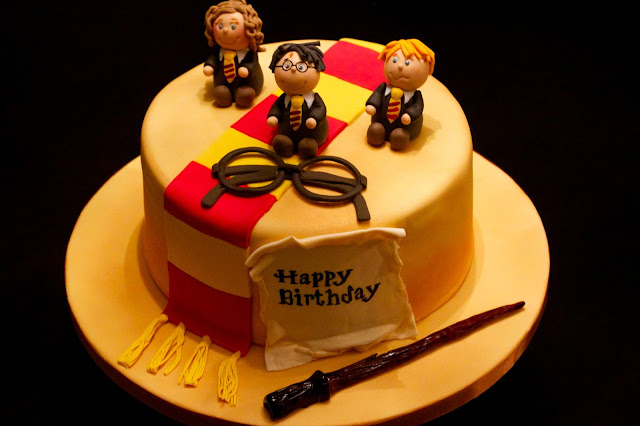
A happy Harry Potter birthday

So after Christmas and the werewolf cake, I decided I was going to take it easy for a bit and just focus on some simpler things. That didn't last very long, in part because I have a very difficult time saying 'no' and I really like Harry Potter. That is how I ended up doing Harry Potter cupcakes and a cake in the past week. 
I kept the cupcakes simple as it was a very busy week. I used modelling paste (half fondant, half gumpaste) for the decorations. The striped scarf was made by 'gluing' red strips to a piece of yellow modelling paste and then running it through a pasta machine. 
I made two little cauldrons and filled them with bright green frosting so that two of the cupcakes could hold candles. I also did Harry faces, lighting bolts and glasses although I think that without arms the glasses look a little like quidditch goggles.


Next was the cake. I wanted again to keep the design simple and cute since it was for a children's party.
The characters are made from modelling paste. The face details are using edible marker and the stripes on the ties painted on using gel paste mixed with a bit of vodka.


To make the hair, I used an extruder. For Hermione I twisted each strand for the curls and attached using edible sugar glue. The modelling paste dried very quickly so I didn't have to worry about the curls coming undone after attaching them.


For Ron, I made him looking a little worried as that is typically how he was throughout the series. When I was attaching the hair, I got a little extra sugar glue on the side of his forehead. I didn't bother trying to clean it off as it actually worked by looking like a little bit of perspiration (although I suppose that it's not very appetizing for a cake, but I've done worse!)


My husband felt that from a side profile, Ron looked like he was mad at Harry Potter. This seemed to work, especially considering the last couple of books. Maybe Ron is just tired of Harry getting all of the attention or he has a horcrux hidden somewhere on him.


The wand was made using gumpaste. I used a few different shades of brown twisted together to make a wood-like colour and used dresden tool to make a wood grain effect. I then painted it with brown gel paste mixed with vodka.

Other details for the cake included gumpaste glasses. This one took two attempts as I broke the first pair.

The scarf was made from fondant. I roughly measured each piece, lined them up alternating the colours and then cut along the sides so it all looked like one piece. Then I placed it on the cake with sugar glue and carefully trimmed any pieces that had stretched when transferring to the cake.


I made a parchment scroll out of modelling paste on which to write 'Happy Birthday'. I did not have time to cut out letters in the Harry Potter font, so I freehanded it using edible marker. It actually didn't turn out too bad considering I left this to the last task and with the time crunch, my hand was shaking.


Unfortunately with time limitations, my photography was not optimal. I really should have  used a flash. To give an antique look to the cake, I  used a large brush to dust the cake, the board and the edges of the parchment with a mix of brown petal dust, gold and apricot lustre dust. It did not really show up in the pictures. Perhaps I should have used a greater proportion of brown petal dust, or just used a flash. You'll just have to trust me that it looked a bit antique.
I really enjoyed making this cake but I have to say, I am tired! I really mean it this time, it's time for some simpler projects!

Saturday, April 21, 2012

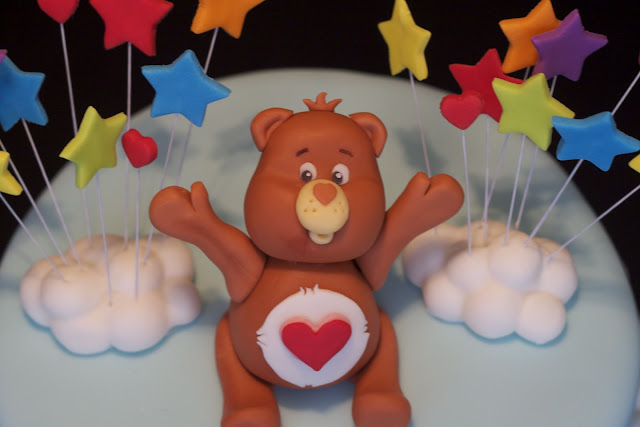
Care Bears countdown to a 3rd birthday

Birthday season continues with a Care Bear themed cake for my nephew's 3rd birthday.


My sister-in-law did not really have a theme for my nephew's party but thought that she would somehow work in the Care Bears since he loves them. She gave me a list of care bears that he would recognize. I chose to make Tenderheart Bear for the top of the cake.


I decided to fashion his arms in a cheery 'Happy Birthday!' type pose, however, with the direction of the eyebrows my husband felt that it looked more like he was being held up. He suggested that I make some bandit bears to accessorize the cake. Unfortunately for my husband, I didn't think the bandits would fit the birthday theme and I also didn't have time to make any extra bears.


What are the Care Bears without the abundance of clouds and stars and rainbows a-la-Care-a-lot? I framed Tenderheart Bear with rainbow-coloured stars dotted with a couple of hearts. I surrounded the border of the cake with various sizes of clouds made from fondant. It took quite a bit of fondant to make the clouds and it made the cake quite a bit heavier than a typical 9-inch cake.


The most fun part of the cake was the inside. It was difficult to get a good picture of it at the party and it's much neater for pictures if you cut a cold cake (not so good for eating though), but you can get the idea.
It was 6 thin layers of vanilla cake filled with lemon swiss-meringue buttercream. I got the idea from Sweetapolita's Rainbow Doodle Birthday Cake and thought that it would be perfect for a Care Bear Cake. I used the cake recipe from the website but made my swiss meringue buttercream using fresh lemon juice and a few drops of lemon oil versus lemon extract. The layers of buttercream are almost thicker than the cake layers! The kids (and adults) loved the bright colours of the cake. 


While making this cake, my husband put on a Care Bears movie for me to watch on my iPad. It brought back many happy childhood memories. This is such a wonderfully cheerful cake for a 3rd birthday and I hope that my nephew enjoyed it!

Saturday, April 14, 2012

A Toopy and Binoo birthday!

When I was asked to make a Toopy and Binoo cake, I must admit that I had to Google the characters to find out what they were. When I discovered how cute they were, I eagerly accepted the challenge. 


This birthday cake was for a 3 year old boy. I was given a few pictures as ideas but I was also told to put my own spin on it for an original creation. I wanted the cake to be fun and colourful like the show. I did some research by watching clips on YouTube. I saw a jungle theme, clouds, bubbles, island themes, you name it, but I could not find anything that would inspire a birthday cake. I then came across a DVD cover for an episode called Binoo's birthday. Perfect! It was colourful, there were streamers and bubbles and stars.

The characters are made from modelling paste made with fondant and tylose. Details are painted on with petal dust (powder food colouring) either dry or mixed with a little vodka. I also use edible marker for some of the details.


I was asked to make a cake with Toopy and Binoo on it but as I was making it, I felt that it wouldn't be complete without also including Patchy Patch (Binoo's plush doll companion).


I made the streamers using gumpaste. The number '3' is made from modelling paste. I find that it is easier to work with to create a nice number (the gumpaste dries too fast). You just have to ensure that you leave  enough time for the number to set.


Both the twisted rope border and bubble border are made with modelling paste. For the bubbles, I tinted the paste with a hint of blue colouring and also finished them with lustre dust for a bit of sheen.


The cake is chocolate filled with chocolate swiss meringue buttercream and crumb coated and masked in vanilla. This cake took quite a few hours to make and along the way I did have my doubts as to whether the colours would go well together, especially after I had covered the cakes in their respective colours and they were sitting side by side without any decoration. It all came together in the end and I was really happy with the finished product. It was bright, colourful and fun just as I had hoped it would be. 

Sunday, January 29, 2012

The dark side of a birthday cake...


I've taken a bit of a baking/blogging break in the last couple of weeks to get myself settled in for a productive 2012. What better way to get back in the swing of things than a Star Wars Lego cake.

This Star Wars cake - the dark side of the Force - had me singing Darth Vader's tune all week long. For added inspiration I had to revisit Volkswagen's 2011 Superbowl commercial and their more recent 2012 Superbowl teaser both of which put me in a great mood for creating and further cemented Darth's theme in my head.

The cake had a few challenges along the way but I was happy with the overall result.

My first order of business was creating Darth Vader as I anticipated the helmet might present a challenge. Do I create the face and then put a helmet around the face or do I created his head using one piece of fondant? My first attempt consisted of creating the face and then I tried to shape a helmet around his face. The result was not great. I decided to sleep on it and see if I could come up with another plan. My second attempt involved shaping the head to include the helmet and then I carefully used an X-acto knife to cut the helmet away from the face. Success! I allowed the body with cape to set for a day before attaching the head and waited another day before attaching the arms to make sure everything was secure. I made him shiny by painting him with piping gel mixed with a small amount of vodka. The details are painted on using both a silver glaze and powdered food colouring mixed with vodka.


Next were the Stormtroopers. Similar to Darth Vader, I made the bodies first and allowed them to dry before making and adhering the heads. The heads were shaped from one piece of modelling paste and details were painted on with colouring mixed with vodka as well as edible marker. It was challenging to paint small black details on white fondant and not get it all over the place. I learned that little smudges could be fixed with a little brush of vodka. I allowed the heads to dry for about a day and a half before attaching them to the bodies. The hands and the weapons were made using gum paste as it dries harder and faster meaning less chance for breakage.


The cake was chocolate devil's food cake with vanilla frosting. Now comes the real challenge of the cake. You may remember my Superman cake post from November in which I fought with a giant air bubble. I attributed this to perhaps missing a spot when moistening the cake. Some people attribute the development of giant air bubbles to a rapid change in temperature after covering a refrigerated cake and that this can be avoided by allowing your cake to come to room temperature before covering it. I must say that I thoroughly chill my swiss meringue buttercream-covered cakes prior to covering in fondant and this has never happened as a result of the refrigeration. Some say that frosting is not stable enough for fondant-covered cakes although I cannot find a good explanation as to why. Perhaps they are right but some people just prefer the taste of frosting. I think you can gather from this paragraph that the giant air bubble or rather bubbles reared their ugly bulges with this cake. If I learned anything from the Superman cake, it was to leave it be as the more you fuss with it, the bigger they seem to grow and the fondant may start to crack in places. It created somewhat of a Jabba the Hut shape to the sides of the cake which for the most part was thankfully covered by the figurines. My other problem with covering this cake was perhaps the brand of fondant. The fondant I use tends to be on the softer side which means that it may be prone to stretching after you've rolled it out. This has not caused too many issues in the past, however in making a dark coloured fondant, you have to add quite a bit of gel paste colouring and this may soften your fondant further. I always weigh and colour my fondant a few days in advance to allow the colour to set and usually the fondant firms up again. I found that this time, the fondant was just too soft and I think this may also have caused problems with getting a smooth finish around the cake as I had to repeatedly re-trim the bottom of the cake. I believe that I am going to be giving another brand a try for covering cakes but may still use my current brand for figure modelling since it still works quite well when mixed with a little Tylose powder. If after switching brands, I continue to experience these frustrations with frosting-covered cakes, I may use frosting only as a filling and continue to mask and crumb coat my cakes with buttercream - it's safer for the cake and my sanity.

May the frosting be with you.

Tuesday, December 27, 2011

A Mater of celebration!

Last cake of the year!


Amongst the holiday baking for family dinners (two gingerbread cakes with cream cheese frosting, a pecan tart and a lemon meringue tart), I made a cake for my nephew's 2nd birthday party which was today. The theme of the party was Pixar's Cars. After deliberating with my sister, I decided to make a Mater cake. 

My cake sculpting experience is rather limited. I typically do regular shaped cakes (round, square, sheet) and make gumpaste/modeling paste figurines and details. I've done one sculpted cake before - it was a baby grand piano to celebrate the refurbishing of a 100 year-old family piano. I will blog about that another time when I'm on a baking break. Sculpting a cake to resemble a car takes a lot of planning and measuring. I borrowed two little Mater toys from my nephew to help with figuring out proportions of the truck and the little details.

It is much easier to carve a cold cake then a room temperature cake. A cake chilled in the freezer is best, however I did not have room in my freezer for that much cake so I did my chilling in the fridge. Once I cut the sheet cakes down to size, I filled my cake and chilled it again before carving out the front, back and the cab. 

The least favourite part of cake decorating for me is crumb coating and masking cakes. I am getting faster but I still find it tedious. After masking this sculpted cake, I promise that I will never ever complain about masking a round cake again. I used a 4" offset spatula but some smaller special shaped trowel ones would have been more ideal.

Covering a sculpted cake in fondant is a bit stressful as you need to work very quickly to smooth the fondant into all of the creases and crevices. 

Because it was such a large cake and I used about 6 pounds of fondant to cover it, I also had to work quickly to cut off any excess fondant from the bottom to relieve the weight on the corners of the cake and avoid tears (both kinds!). 

The tow rig is made with gum paste and the details are painted/brushed on using gel paste, and coloured dusting sugars. 


The cake is vanilla, filled and masked with vanilla swiss meringue buttercream. The board is covered with royal icing and brown sugar to look like desert dirt.

I was happy with my second attempt at a sculpted cake and I think that the birthday boy was too!