Showing posts with label Flowers. Show all posts

Thursday, June 26, 2014

Spring, I invoke thee!

Yes, it is summer now, but I made this cake before it was even spring. There was snow outside. I shudder at the memories. This was a birthday cake for my sister-in-law. She loves the super sugary frosting grocery store cakes and always asks for extra flowers on the cake. I decided to make my own version of a sugary flower cake. 
We had such a horrible winter everything was white, grey, brown and just dirty looking for too many months! I was ready for some vibrant spring/summer colours. 
I am not fabulous at piping flowers with frosting. I much prefer working with fondant or modelling paste. Personally I think that it is not only easier (for me anyway), but you can get much more creative with the types of flowers you can make. This blue ruffle flower below was made with several different sized circles of modelling paste. I thinned out and ruffled the edges using a stick tool with a tapered end. I then placed the layers one by one in a small bowl with the largest circle on the bottom and getting smaller as I got to the centre of the flower.
I used plunger cutters for the daisy type flowers. The make the centres, I took some brown modelling paste, pushed it through a strainer, scraped it off with a knife and then used a circle cutter.
I also made ribbon roses which I think are really cute. The thick, puffy look is a nice contrast to the thin ruffled flowers.
I used a 5-petal flower cutter to make the other flowers - I don't even really know what to call them since they aren't modelled after anything real.
Since my sister-in-law enjoys sugary frosting, rather than just simply icing the cake, I decided to pipe ruffles around the cake for a maximum frosting to cake ratio. I used a rose petal tip (#104) to make the alternating shades of green ruffles. I had a bit of trouble when I got to the top edge and turned the tip the wrong way around prematurely but the overall effect is still there. 
The cake of course was vanilla with vanilla frosting - no shortening used in this 'grocery store' cake though. Just lots and lots of butter!


Monday, December 30, 2013

Peonies and piping

It was about two and a half months before I made another cake after the one that I dropped. I wasn't necessarily discouraged. It's more a lack of time. Less than a week after the cake disaster, we hopped on a plane to Europe and spent a fabulous two and a half weeks in Paris, Edinburgh, Aberlour, Castle Combe and London. Two and a half weeks was fabulous but it wasn't enough time to get through all of the gorgeous pastries that I wanted to try. After that, I really had to focus on my graduate studies. Before I knew it, it was already November and my mother's birthday. 

I wanted to take the opportunity to practice a couple of skills - flowers and piping. I had seen quite a few beautiful wedding cakes with lace-like piped pattern and wanted to give it a try. There were a lot of very similar cakes and I wondered if there was some sort of template out there or if people were just piping the design freehand. I perused a couple of cake decorating stores and could not seem to find any templates so I decided to just give it a shot on my own. The flower shape I used for the lace is a dogwood flower. I bought some very fine decorating tips - size 0 and 00 to do the intricate lines. When I got started I realized that those tips were just too small for me to work with on a cake. Since I moved a size up for the smaller tips, I unfortunately did not have tips large enough for the thicker lines and ended up just cutting a hole in the end of a disposable piping bag. It wasn't ideal but it worked. From far away, the piping looks neat enough. It was not as smooth as I would have liked close up. One of the tools that I find extremely helpful when piping royal icing or doing stringwork is this yellow spatula-pick thingy. It is absolutely fabulous for scraping off mistakes or broken lines. I don't actually know the real name for this tool but 'Boo-boo stick' seems appropriate given it's most useful function. 
I've only attempted one peony-like flower before. I like them because they still look very pretty if not terribly realistic or accurate. There are lots of tutorials online. There are also a few different styles of peony cutters. I used this one. I did the veining of each petal by hand using a gumpaste veining tool. It was tempting to purchase a silicone mold kit but they are quite expensive and at the rate I'm making cakes right now, I might make one peony a year. I think I liked the overall shape of this peony better than my previous attempt. I left it more open at the bottom so I didn't need any filler petals when I placed it on the cake. I still ended up having it quite condensed in the centre and would like to try again to make it even more open. 
The flavour of the cake was coconut and it was filled with pineapple swiss meringue buttercream. To make the coconut cake, I took my favourite vanilla cake recipe and switched out the milk for coconut milk. I also pulsed some unsweetened dried coconut in the food processor and added it to the dry ingredients. I added a bit of coconut extract to the simple syrup but found that it smelled really artificial so I made another batch of simple syrup and added only one drop of extract. It was a little better. 
For the pineapple buttercream, I used canned pineapple chunks along with the juices to make a pineapple reduction. I pureed the pineapple reduction and added it to the buttercream. It was a subtle flavour but nice. 

Monday, December 17, 2012

Fashioning a cake fit for a fashionista

When I was asked to make a cake with a fashionista theme, I didn't know if I would be able to meet the challenge. The scariest part was that I had never made a shoe before and it was a rather important part of the cake. Other minor challenges included not having very much experience (i.e. no training) in making flowers, no experience with pleating and using a temperature sensitive cake filling (cream cheese frosting) requiring refrigeration of the fondant-covered cake. 


I was pretty much given free reign with the design of the cake. I decided to go for an elegant cake design personalized with the birthday girl's likes: her favourite colour (grey), Christian Louboutin patent peep toe pumps, Tiffany & Co., Holt Renfrew and Mini Cooper. The requested cake flavour was carrot with cream cheese frosting. Since I needed to refrigerate this cake, I decided to use a different fondant. I used Satin Ice as I had read that refrigeration doesn't compromise the look or texture of the fondant. I had also read however that the fondant also dries very quickly and thus leads to a greater potential for an 'elephant skin' look to the fondant which is not desirable. The only time I've ever had an issue with 'elephant skin' was when I participated in a class where we were instructed to use corn starch rather than confectioner's sugar for rolling out the fondant. I found the corn starch really dried out the fondant. With this in mind, I made sure to use confectioner's sugar rather than corn starch to prevent sticking, and I also tried to work faster to cover the cake. I was disappointed to have some spots with a more rough texture. Luckily, I was covering the cake in pleating, so I was able to cover these spots. Overall, the fondant did set quite nicely and most importantly, not one drop of condensation or stickiness when I took it out of the fridge. I did take precautions with this though and put the cake in a box, wrapped the box in plastic wrap and also adjusted the temperature in the fridge (I have an extra fridge that I can use just for cake stuff). I also kept my house temperature on the cold side. Based on the performance of the fondant with refrigeration, I think the brand is a keeper for me. I might just knead a bit of shortening into it before rolling out although this doesn't seem to be recommended by the manufacturer.


This was the first time I had tried to make a realistic-looking flower. I think that it still ended up taking on more of a fantasy flower look than a real peony but I think it was still pretty. The last time I made a peony-like flower, I used modelling paste rather than gum paste alone. I found that it was too soft to work with and therefore the edges of the petals would tear when thinning them with a ball tool. This time I used gumpaste. It was easier to roll out very thin pieces of fondant and shape the petals. The gumpaste did set very fast though and didn't allow very much manipulation of petals after the flower was done. I set the flower in a bowl covered with foil to dry. I think next time, I will make the foil more shallow so that the petals at the bottom of the peony will be more open.


When I placed the peony on the cake, I filled in the bottom with a few extra petals. I did a very light dusting with pink petal dust to give the petals a more realistic shading/colouring. The brush I was using wasn't quite soft enough so I had to be extra careful as the petals are very delicate and fragile.


The birthday girl drives a Mini. Rather than putting a car on a fashionista cake, I decided to put a the key fob on it. This was made from 50/50 or half gumpaste and half fondant. It was challenging painting the logo on it as the key was quite small. I used a 000 size brush, but even so, I barely squeezed the word 'MINI' on it. 


The Tiffany box is made from Rice Krispie treats. I discovered that pre-made treats are much easier to work with then homemade treats. It is easier to make a more compacted and smoother structure. In the past, I have noticed that it is more difficult to really compress homemade treats so that the shape will be stable. Although the gumpaste ribbon covers most of it, I did paint the logo on the top of the box. 


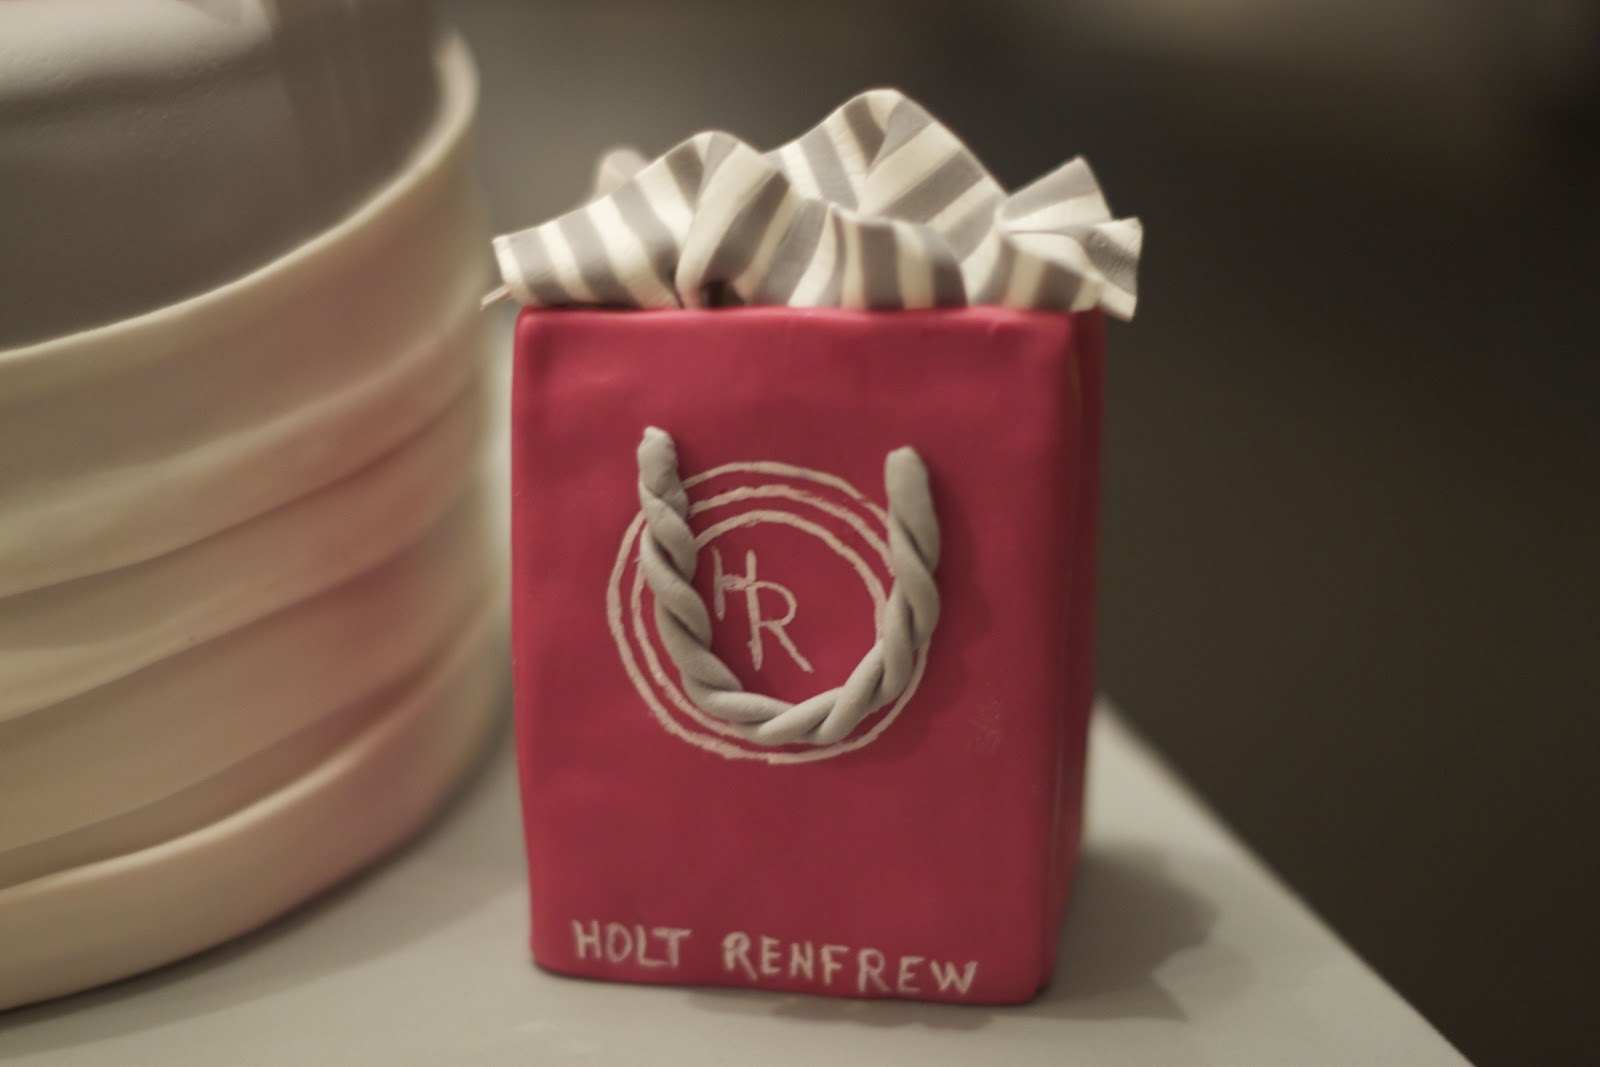
The Holt Renfrew bag was one of my favourite things, mostly because of the striped tissue paper. For some reason, I found it difficult to get the right colour for the bag. It took two attempts and a lot of combinations of gel paste before I got a colour I was satisfied with. I started with 'fuschia' but found it was just too dull. I ended up brightening it with electric pink gel paste. I painted the logo onto the bag using white petal dust mixed with a bit of vodka. The striped tissue is made with gumpaste and the handle made with 50/50 and an extruder. 


At first when I thought about using grey on a cake I thought to myself that it wouldn't be a very appetizing cake colour. After looking at a few images of grey cakes, I thought it could look rather nice - modern and elegant. To make this grey cake visually more interesting, I added white pleating using 50/50 and a gumpaste pearl medallion. I brushed the pearl medallion with a bit of lustre dust so they looked more authentic. I think that they grey and white went very nicely with the pink of the peony and Holt Renfrew bag.


Now for the shoe. I had less than two weeks to figure out this shoe and after researching online, I found that it was recommended to let the sole and heel dry for a week. This meant that if the shoe broke, or looked awful, I would need to think of something else to put on the cake.
To make the sole, I carved a piece of foam to a high heel shape and covered it with parchment. I allowed the gumpaste sole to dry for 5 days along with the heel. The biggest challenge and scariest part of the shoe was the fact that it was a pump and not a sandal, meaning that I had to figure out how to cut out one piece of gumpaste to fit around the whole shoe. A sandal would have been much easier for a first shoe attempt but I was told the birthday girl had a pair of patent peep toe pumps. I'm not the best person at looking at a 3-dimensional item and being able to transfer that into a flat shape that can become a 3-dimensional item. I think I had a brain teaser game that had challenges like that - I was awful at it. I tried to make a paper template by making a foot shape out of old fondant I wasn't using anymore. This got me closer to figuring out the general shape that it had to be but it was difficult to bend the paper around the shoe to see if it would be the right fit. I need to use something more flexible to make the template, so I decided to use the medium that I would be making the actual shoe with - gumpaste.


I was really happy with the curve of the arch on the pump. I don't think that I could have hoped for a better outcome for a first shoe attempt. I think the peep toe was a bit large but that's just me being picky!
To get a 'patent' look, I used 2 coats of vodka mixed with black gel paste.


I am very proud of this cake. It was a great learning experience as I figured out quite a few new techniques. I'm not sure how soon I'd like to try another shoe though - it may have been beginner's luck! 

Monday, May 21, 2012

A Pretty Blue Birthday


This cake was a variation on Mich Turner's 'Art Nouveau' cake from the book The Art of The Cake. I loved the simplicity of the design and thought that it would be a lovely cake for my sister's birthday. 
Instead of the simple 2 layer flower on the cake in the book, I decided to try to make a more full and ruffled bloom. I used modelling paste to make this flower instead of gumpaste as the modelling paste takes a little longer to dry and gave me more time to manipulate the petals. I discovered in this process that I do not like my plastic ball tool. It actually has a seam in it that catches the modelling paste on occasion and tears or comes close to tearing the petals. I think that investing in a metal ball tool would be worthwhile for future flower-making attempts. The centre of the flower is filled with little balls of modelling paste lightly brushed with lustre dust. 

The swirly design is piped on with royal icing. The book offers a template however I just freehanded the design. I did use my inscriber tool to lightly mark where I wanted the swirls. You don't want to be too heavy handed with this as your royal icing 'strings' may not fall exactly where you want them to, especially when making big swooping swirls on a larger cake. Speaking of larger cakes, this cake is shown as a cute little 4-inch cake in the book. If you want to do a larger cake (this one is an 8-inch cake), be prepared to have a lot of patience piping on the little accent dots. 

My nephew thought that the design on this cake looked like an octopus. I guess at age 7, you are more likely to associated swirls with an octopus rather than art nouveau. 


The cake itself is Sweetapolita's Vanilla Bean Latte Layer Cake with a few minor variations in the buttercream. My swiss meringue buttercream recipe makes about 8 cups of buttercream so I used 2 vanilla beans in addition to a teaspoon of vanilla extract, and increased the instant espresso to 1 tablespoon + 1 teaspoon. I love the look of buttercream speckled with vanilla bean seeds. 

The cake flavour was nice although I felt the texture was a bit dense. It may be that it is the intended texture of the cake or perhaps I over mixed the batter, although the cake layers rose quite well in the oven.  
The flavour of the buttercream was wonderful and it gave me a great idea for another May birthday cake. Stay tuned! 


Thursday, January 12, 2012

Citrus-y Carrot Cake


I have quite a few goodies from Christmas for cake baking, inspiration and design. This week I used Mich Turner's The Art of the Cake and my new flower cutters to make this 6-inch carrot cake.

I made the flowers using modelling paste made with fondant and tylose powder.


The design is piped on with royal icing and is the lace design from the book. I think that I made my royal icing too stiff as the design in the book looks softer and shinier. I also used a quick royal icing using water, meringue powder and icing sugar with a small whisk rather than using egg whites which may have also affected the consistency of the icing for pressure piping. I think that the overall effect is still lovely though.


The recipe for this very moist carrot cake with a hint of citrus is also from Mich Turner's book with one minor alteration in that I used toasted pecans instead of walnuts purely due to my taste preference. I am also not a fan of raisins but they are rum-soaked, so I thought I would give them a fair shot. The cake has the added moistness of a citrus-based syrup that is meant to be poured over the cake as soon as it is removed with the oven. I used the syrup as you would use a simple syrup and brushed it over my cooled cakes after levelling. The cake is iced with cream cheese frosting that I also spiked with a hint of orange extract.

Overall this was a great project to work on my flowers and my piping skills. This is also the first time I've ever made carrot cake. I will definitely be adding this cake flavour to my repertoire although I may omit the raisins - they remind me too much of fruit cake.