Showing posts with label chocolate. Show all posts

Wednesday, February 18, 2015

Celebratory Layer Cakes!

I have disappeared for the last several months - almost eight months to be exact. Life has been busy and I have not had very much time for baking and blogging. I've been working, researching, organizing, purging, crocheting, singing and doing a little bit of baking here and there. I thought I would take some time to post a few of the cakes I did that I didn't get a chance to write about as I do not foresee a lot of time for blogging in the near future - more on that later in a couple of posts.

I had no idea what to call this post. What cake isn't 'celebratory'? These are two cakes that I did for family way back in May 2014. It has been so long that I'm not even 100% sure of what the flavour of the first one was. It definitely had something to do with almonds! I rarely do cakes that don't involve fondant decorations but I wanted to try some simpler but no less scrumptious looking cakes.

The first one was a Mother's Day cake - I know it doesn't look very Mother's Day-ish but really it was about the flavour. My mom doesn't like chocolate cake - although she has admitted to enjoying mocha cake with dulce de leche buttercream. I know she likes coffee flavour, so I made an almond flavoured butter cake with espresso based swiss meringue buttercream (I'm 98% sure that was the flavour) and garnished with toasted almonds. 


I was insistent that the almonds had to be sliced almonds but not blanched. Without the skin, they would just blend into the colour of the buttercream. They were a little harder to find but they look much better than blanched! 


The second cake was for my sister's birthday (same weekend!). I learned that my sister really enjoys chocolate malted milk balls and decided to run with that for a cake flavour. I wanted the cake to have the flavour of malted milk throughout and have a similar texture. 


I started out with a chocolate butter cake. For the crunchy texture found in a chocolate malted milk ball, I thought dacquoise would work well but it is a meringue that is traditionally made with nuts like hazelnuts or almonds and layered with buttercream or whipped cream and I did not want any nutty flavours overshadowing the malted milk flavour. I ended up making pseudo-dacquoise which was essentially large layers of chocolate meringue (piped in a large swirl) that I also added Ovaltine (original, not chocolate) powder to in place of some of the cocoa powder. The swiss meringue buttercream was chocolate with more Ovaltine added to it. I was worried that the Ovaltine might add a gritty texture to the smooth buttercream but it ended up being fine. The result was my cake version of a chocolate malted milk ball. It was very hard to cut into slices to serve but the flavour and texture was exactly what I wanted. 


I wanted the outside of the cake to be fun and birthday-like and you can't achieve that any better than with colourful sprinkles a-la-Sweetapolita. I originally did not plan to put the sprinkles that far up the cake but I got a little carried away - it just got higher and higher. You can never have enough sprinkles though. I decorated the top with large piped shells and chocolate malted milk balls. I must confess that I think I bought a pound of malt balls of which only 17 ended up on the actual cake and the rest ended up in my stomach - not all at once but they were gone much faster than I'd like to admit!


Monday, July 16, 2012

Monkey Martini Cupcakes


Each year we have a year-end potluck for our interns and each year I try to create a new cupcake flavour combination, usually containing a bit of alcohol. In previous years, I have made Guinness chocolate cupcakes with Bailey's frosting, 'Cream-sicle' cupcakes containing Cointreau and Godiva white chocolate liqueur, and cookies and cream with Oreos and again, Godiva liqueur.

This year, as we are in the midst of moving, my husband has packed away quite a bit of our liquor cabinet. Apparently there was no rhyme or reason to what he packed away, with the exception of his bottles of scotch. Gone was my bottle of Bailey's and my bottle of Godiva liqueur. What I did find was a bottle of creme de banane, so I got the idea to make chocolate cupcakes with a creme de banane frosting.


A Monkey Martini is typically made with vodka, creme de cacao, and creme de banane. I have seen variations with the inclusion of Bailey's, however since that was packed away, it didn't make it into the cupcake. Creme de cacao is a colourless chocolate liqueur with a hint of vanilla. I did not have any of this but wanted to capture the flavour in the cupcake. I decided to make a white chocolate ganache to fill the chocolate cupcakes. The ganache filling was made with cream, Callebaut white chocolate callets, and a little vodka.


The frosting was flavoured with vanilla and creme de banane. It tasted like a banana popsicle. Yum!
I garnished each cupcake with a banana chip dipped in Callebaut bittersweet chocolate.


Tuesday, May 15, 2012

'Ferrero Rocher' Cake Pops


I have a love-hate relationship with cake pops. I love the idea of them, I love thinking of flavours and designs, and I love eating them. I don't love the process. Perhaps since I've only made them twice, I haven't optimized the timing of everything as I've almost done with making cakes. Perhaps it is because I was unable to account for the unplanned event of purchasing a house this week, which changed my schedule and resulted in dipping chilled morsels of cake into chocolate at 2 in the morning. I have to admit, after a bit of sleep, I did love the end result, so I haven't written cake pops off entirely.


These cake pops were for the dessert portion of a dinner party. I wanted them to be pretty and shimmery like the pearly cake pops but simpler in execution since I was making 40 of them.
The flavour of the cake pops was inspired by the candy Ferrero Rocher. I used my favourite chocolate cake recipe mixed with Nutella frosting from Sweetapolita. I covered these in white chocolate melts.

Last time around, I discovered that if I dipped the cake pops in warmed chocolate right from the freezer, it resulted in cracking of the chocolate as the cake pop expanded and it warmed to room temperature. This time I dipped them directly from the fridge. I still had an issue with a few of them cracking and adjusted my technique to take out several cake pops from the fridge at a time. If you leave them at room temperature for too long before you get to them, they get too soft and you end up getting crumbs in your white chocolate. You also risk the chance of the cake pop falling off of the stick.


For the garnish, I wanted to use hazelnuts to enhance the Ferrero Rocher/Nutella taste. I found that it was very difficult (impossible) to find blanched hazelnuts. I learned that you can easily blanch/peel hazelnuts by placing them in boiling water with baking soda added (like when you make pretzels!). You boil them for about 3 minutes and then place them in a bowl of ice cold water.  The skins slide off fairly easily in the cold water. I then placed them on a paper towel to dry. Once dried, I chopped them in a food processor and toasted them. To add shimmer, I tossed the toasted nut pieces in gold lustre dust. I also sprinkled the cake pops with edible gold stars.

When I finished at 2:30 am, I found that I wasn't really satisfied with how they turned out. After a bit a sleep and with the added packaging, I thought they turned out to be the perfect treat for the end of a dinner party. During this process, I told my husband to never allow me to make cake pops again. After reviewing the photos and eating a few, I can't say that I am so resolved to avoid them entirely. I just love them too much.


Saturday, March 17, 2012

MacaBooms!


It has been a little while since my last post. I was busy being a diligent Master's student and then I got sick. Influenza cupcakes anyone? I didn't think so.

I am happy to be back in the kitchen and just in time for St. Patrick's Day!

One of my favourite cupcake recipes are the chocolate Guinness cupcakes with whiskey ganache filling and Bailey's Irish Cream frosting that I made back in December as part of my holiday baking.

These cupcakes are based on the not-so-politically-correct beer cocktail - the Irish Car Bomb. This drink involves dropping a shot glass of Bailey's Irish Cream and Jameson Irish Whiskey into a glass of Guinness.

Since I have been on on a bit of a macaron kick, I decided to combine these glorious (but perhaps offensive) flavours into a macaron, but with a softer, less offensive name. I give to you....the MacaBoom! (patent pending).

Each time I think about making macarons, I go through a bit of an internal battle - French method - Italian method - French method - Italian method. In the world of macarons, I guess you could ask the question: What would Pierre Hermé do? Pierre Hermé is a French pastry chef well known for his macarons. He has a beautiful book that is worth a peruse the next time you're at the bookstore. Since I do not own this book and it's a bit of a financial commitment at about $50 (you better love the art of the macaron), I decided to search online to see if any of his recipes were available. It turns out that he uses the Italian meringue method. I decided to continue my research with a more hands-on approach. A few weekends ago I went to one of my favourite Toronto patisseries and picked up a few macarons. I also asked what method they used - French. The macarons were delicious - so once again, French it is! One day I may be convinced to try the Italian Meringue method - just to compare.

These macarons feature a chocolate macaron shell, a stout and whiskey chocolate ganache, and Bailey's frosting. I went with a frosting versus my usual swiss meringue buttercream simply because I did not have any leftover swiss meringue buttercream and it is easier to make a small quantity of frosting. This frosting is very sweet and so is the macaron shell, so I decided to use a dark chocolate for the ganache to offset some of the sweetness.


For the shell, once again I ground whole, unblanched almonds using my coffee/spice grinder and this time I used leftover egg whites that I had stored in the freezer vs pasteurized egg whites from a carton. My previous decisions to use pasteurized egg whites was simply because I had them leftover from making swiss meringue buttercream for a cake. If the eggs are not going to be cooked as when making buttercream, it is safer to use pasteurized egg whites. Some people believe that you don't get as good a volume as compared to freshly separated egg whites but I've never had a problem. If you plan on cooking your egg whites as is used in meringue based cookies/decorations, egg whites frozen from fresh are fine. Egg whites can be stored in the freezer for up to 4 months. I freeze them in mason jars and label them with the number of egg whites and the date. I thaw in the refrigerator overnight and then let them sit on the counter to come to room temperature before using for macarons.

I was trying to think of a way to incorporate the Guinness into the MacaBoom. Since the shells are so finicky that didn't seem like a successful option. Then I came across the show Sweet Genius while channel surfing one evening. One of the surprise ingredients was stout and one of the chefs mixed it with chocolate. This chocolate ganache filling is made with 3 oz dark chocolate, 3 tablespoons of heavy cream (35% M.F.), 1 teaspoon of butter, 1 teaspoon of Jameson Irish Whiskey (I may have added a little bit more as I had a spilling situation while pouring) and 2 teaspoons of Guinness. The taste of the alcohol in the ganache is not too prominent but it's the thought that counts!

The Bailey's Irish Cream Frosting is from here. I halved the recipe and put 2 generous (overflowing) tablespoons of liqueur in it.

To assemble, I piped a generous dollop of Irish Cream frosting on one half and spread a small amount of ganache with a dessert spoon on the other half (a little goes a long way with the ganache).

The macarons are decorated with little fondant shamrock decorations made with hearts.


Happy St. Patrick's Day!

Sunday, February 05, 2012

Pearly Pops


Cake pops. Popular and tasty as they are, I have never had much of an interest in making them. As much as I love chocolate, I find the process of dipping things in chocolate to be both tedious and messy. I admire those who have popularized and mastered these tasty morsels of cake mixed with icing.

I had some leftover chocolate cake scraps and vanilla frosting and rather than letting these sweet commodities go to waste, I decided to make cake pops. There is a cake from Mich Turner's The Art of Cake that I have been looking forward to trying. The cake design was inspired by a Chanel clustered pearl necklace. I thought I would try this design on a smaller scale on the cake pops.

For the inside of the cake pops, I used leftover devil's food cake and mixed it with vanilla frosting. I did not measure anything. I added cake and frosting until I achieved a texture that seemed easy to work with.
I rolled the cake mixture into loonie-sized balls. I dipped the lollipop sticks in melted white chocolate wafers before sticking them into the cake balls and put them in the freezer to set.


I melted more white chocolate wafers in the microwave and re-warmed as needed throughout the dipping process. The first few cake pops cracked as the chocolate set. After a quick search on the internet, I found out that there are a few theories as to how this can happen. One theory is that this happens due to the cake pops being too cold therefore it is advised not to dip them directly from the freezer. Another theory is that if you compress the cake pops too much when rolling that they may expand once they've been warmed and dipped in chocolate causing the coating to crack. I took them out of the freezer and as they warmed to room temperature, they did not have cracks as the chocolate coating dried. The only problem was that by the time I got to the last two cake pops, they were too warm to stay securely on the lollipop stick. I suppose the best compromise would have been to keep them in the fridge. I found the chocolate a bit thick to work with, so thinned it with a few drops of grape seed oil. The chocolate cake was unfortunately too dark for a white chocolate coating which led to a grey-ish hue.


To decorate the cake pops, I made a small batch of royal icing and tinted 1/3 of the icing gold, 1/3 ivory and left 1/3 white. I piped the balls using a no. 1, 2, 3 and 4 tips. Unfortunately I had only one no. 1 tip as I think the pearls were better with smaller tips and left less of a peak. You could brush the peaks down with a damp brush but the process was already quite long and it was really just a practice run for a full-sized cake. After I finished covering the cake pops, I used gold lustre dust and a white-ish lustre dust mixed with a little vodka to paint the gold and ivory pearls. The effect was not quite what I had hoped to achieve but I think it will be easier on a larger surface to get a higher proportion of smaller-sized pearls and it will look much better on a white background then then a grey-looking background.

The most important thing was that they were delicious! I do not think that these will become a staple of my cake decorating ventures but was happy to have tried them.

Tuesday, December 20, 2011

One good drink deserves another...

Good morning Guinness! (and Jameson Irish Whiskey...and Bailey's Irish Cream...)


For the next potluck I decided to make cupcakes that I've done before and have been quite well-received. They are chocolate Guinness cupcakes with a whiskey chocolate ganache filling and Bailey's Irish Cream frosting. The original recipe is from Smitten Kitchen and was adapted slightly by the Curious Domestic.  

I prefer to ice my cupcakes with a generous swirl of frosting for an optimal icing to cake ratio, however this frosting is very sweet and a smaller swirl goes a long way. 


Now the beauty of this recipe is that it leaves you with a few extra goodies to make another treat. The Curious Domestic uses the leftover cake from making the holes in the cupcakes for filling, and leftover ganache to make little 'truffles'. The leftover ingredients screamed 'cake balls!' to me. There has to be a more appealing name for these little confections of cake, frosting and chocolate. Henceforth in this post, they shall be referred to as 'cake sphere-lets', uh.. 'cake globes'...hmm...'cake crumblettes'..no...'cute spherical cakelets'....cake balls it is! I made cake balls once after a little cupcake project hiccup - they aren't my favourite thing to make with all the fuss of dipping things in melted chocolate (unless they are peppermint patties - have to stick that in so that my husband can sigh in relief) and I don't think I would ever bake a cake with the sole intention of crumbling it up and mashing it with icing, but they are a tasty use of cake scraps and leftover icing. 

For these cake balls I had about 1 1/4 cup of cake crumbs and I mixed this with 2 tablespoons each of leftover chocolate ganache and Bailey's frosting. Now normally I would put this mixture into the fridge before rolling them into perfectly shaped little balls, but I had to get to a potluck so I made them into shapes loosely resembling balls before I left and placed them in the fridge to harden. To coat the cake balls, I melted 5 oz of semi-sweet chocolate in a small bowl over a pot of boiling water. I probably could have used more chocolate to make the dipping a bit easier but I did not want to use up that much chocolate for a leftovers treat. You want to dip quickly as the chocolate heats up the cake ball and the longer you roll the ball around in there, the higher the chance you may end up with cake crumb escapees ruining the smoothness of your chocolate. I decorated the cake balls (a little haphazardly) with some leftover frosting and voila! Chocolate, Guinness, whiskey and Bailey's cake balls! 


Saturday, December 17, 2011

Nothing says the holidays like liquor-infused baked goods!

So much for a baking break. 'Tis the season of potlucks. I always struggle with whether to bring something cooked and savoury rather than a sweet treat, but the struggle is always short lived and out comes the butter, milk, eggs, sugar and flour.

This week: 2 potlucks in 3 days. With all of the business of the season and planning desserts and cakes for family Christmas dinners and an upcoming birthday, there isn't a lot of time for making anything elaborately decorated. I decided to compensate with alcohol.

Hello amaretto.


For my first potluck, I decided to make the Chocolate Amaretto Bundt Cake from the Magnolia Bakery cookbook. I haven't done a lot of baking of desserts that don't end up being covered in icing or fondant. How you make a bundt cake pretty? I used the Heritage Bundt Cake pan from Williams Sonoma. The pan creates a beautiful swirl design. I've made one bundt cake before - it was the recipe that came with the pan. I found it on the dry side and it needed to be a la mode to improve the moistness and palatability. This chocolate amaretto cake promised to be delightfully moist.

I've read about dusting a lightly greased pan for a chocolate cake with cocoa powder rather than flour in order to avoid remnants of white flour on a dark cake. I attempted this with little success - the cocoa powder stuck in clumps to the greased pan and it dissolved slightly. I brushed the excess cocoa powder out with a pastry brush and dusted the pan (easily) with flour. I had no issues with white residue on the cake, despite using flour. I (not so) lightly dusted the cake with icing sugar - just like a light dusting of snow. 


The cake was, as promised, quite moist with a nice, strong amaretto flavour which comes from using good amounts of both almond extract and amaretto liqueur. I still think the cake might be improved with some sort of chocolate glaze although I would use a different pan in that case because I feel that a glaze would detract from the simple beauty of the swirl design. 


Sunday, November 20, 2011

Chocolate Candy Cane Cupcakes


We are having a holiday bake sale at work, so I decided to bake something festive. Enter chocolate cupcakes with peppermint frosting topped with crushed candy canes.

The chocolate cupcake is devils food chocolate. For the frosting I used peppermint extract with little bit of vanilla as well. I piped the swirl using a large french star tip.

The crushed candy cane was a little bit of an expedition. Note to self - not all peppermint candy canes are created equally. Paired with the peppermint icing, the first candy canes I bought did not end up tasting like mint. This necessitated a last minute trip to the store to buy better quality candy canes. I beat the candy canes into crushed submission by placing them in a ziplock bag covered by a tea towel and smacking them with my heavy duty All-Clad 1 cup measure. My husband felt that this was both too loud (we live in a condo) and ineffective. He crushed them by rolling a glass mason jar over them. In retrospect, I should have pulsed them in my mini food processor. I will keep this in mind for next time!

Coming up next, modelling paste figurines!

Saturday, November 19, 2011

Mmmacarons...

Venturing outside my comfort zone of baking cakes and cupcakes, I decided to try to make French Macarons since I had a small amount of leftover swiss meringue buttercream and quite a few leftover frozen egg whites from making pate sucree tart shells and pastry cream.


I have wanted to try these for a while but after reading various recipes, blog posts and articles, I have to admit that I was feeling a little intimidated! 

French macarons are made with egg whites, icing sugar, granulated or caster sugar (superfine), and ground almonds. The ideal macaron has a smooth domed top, and a round base (also called the foot). The popularity of the macaron has soared in the last few years (although they have been around in France since 791) and you can find a number of books dedicated solely to these chewy, melt-in-your-mouth confections. 

There are so many possible macaron flavour combinations out there and they can be filled with buttercream, jam or ganache. 

I settled on a Maple-Cocoa recipe from a blog called Delicious Delicious Delicious. With a blog title like that, how can you go wrong? The yield of this recipe was also modest and perfect for a small amount of leftover buttercream.

For the ground almonds, I processed whole almonds (including skins) using a coffee grinder with a few almonds and a little of the powdered sugar at 5-second intervals to achieve a powdery texture. I then sifted each 'batch' of almonds and powdered sugar to catch any almond chunks that weren't sufficiently ground. I threw these back in the grinder and repeated the process until all the almonds were ground to a fine enough powder. 

I then sifted the ground almonds, remaining powdered sugar and cocoa powder into a small bowl. 

The recipe calls for caster sugar which is also known as 'superfine' in North America. I don't know if the Redpath 'Special Fine' granulated is 'fine' enough so for good measure, I ground it in my mini food processor. 

Now for the egg whites. There are some firm believers that you must used aged egg whites to make macarons. From a food safety perspective, I am really not a fan of leaving egg whites at room temperature for several days. I have several jars of egg whites in my freezer from various baking expeditions. They can be safely stored in the freezer for up to 4 months. I label each jar with the number of egg whites and the date. For this recipe I used 2 frozen egg whites that I thawed in my refrigerator overnight and let them come to room temperature prior to making the macarons. 

I piped the meringue mixture onto a Silpat liner instead of parchment paper for super easy removal! This recipe suggested leaving them to sit for 30 minutes prior to baking them. I have also read that you should leave them for at least 2 hours in order to get the right texture and adequate development of the 'foot'. I was in a hurry and let them sit for 30 minutes and the 'feet' developed just fine in the oven. I baked them for about 12 minutes but I think they could have used an extra minute or two. 


I was able to easily lift them off the liner with my hands - no need for a palette knife.

They have a little texture on the inside because I used the wrong side of the Silpat mat, ha ha!


For the filling, I had leftover vanilla swiss meringue buttercream. I beat the buttercream with a small amount of maple extract. I was not satisfied with the flavour - it tasted like an artificial extract. To remedy this, I added a little pure maple syrup at a time until I was satisfied with the taste. I also had my husband approve the flavour balance as he is a maple fanatic. 


I was extremely happy with the results of my first attempt. They are not perfectly smooth - I suppose I could have avoided the little piping 'knobs' on the top by gently tapping my pan before putting them in the oven. It is recommended that you refrigerate them for 24-48 hours to achieve the proper texture and then bring them to room temperature before enjoying them. We ate them almost right away and I had no problems with the texture! Now the only question is, what flavour do I try next?

Sunday, November 13, 2011

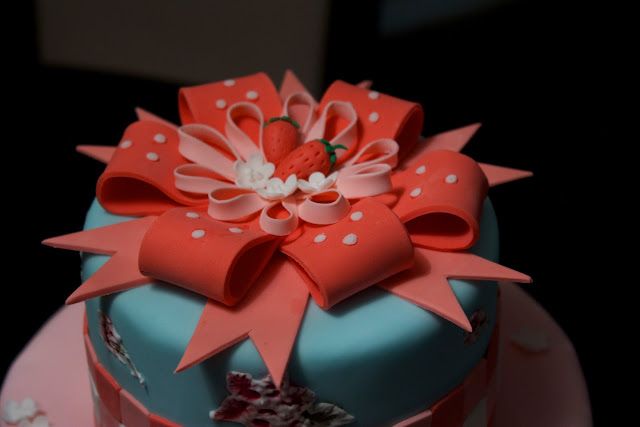
Berries, bows, and chocolate, oh my!

What do bows, berries and chocolate have in common? This weekend's cake!


This weekend I took a class at Bonnie Gordon College, taught by the very talented Susan Trianos. The cake used a number of techniques, some that I was familiar with and some that I wasn't. We learned to make a gingham ribbon, which is similar to creating mosaic with sugar. We also learned to make two different styles of gumpaste bows - I love bows. I may just have to stick them on all of my cakes. One of the techniques that I was not familiar with was painting combined with royal icing brush embroidery. I definitely need to work on brush embroidery! My painted flowers looked lovely from afar but were not photo-worthy close up.

The little miniature strawberries had to be my favourite - they were so simple but so cute! 


So where does the chocolate enter the picture? For this class, we had to prepare an 8-inch cake masked in swiss meringue buttercream. I recently treated myself to a bag of Cacao Barry Extra Brute cocoa powder and Barry Callebaut bittersweet chocolate callets, so I decided to make a devils foods cake filled with chocolate swiss meringue buttercream and masked in vanilla. The cocoa powder has an amazing silky texture. I don't think I can bake with anything else now. My husband wondered if we should try making hot cocoa with it. I told him that we have to use up our other regular powder first because I am certain it will be a point of no return. The cake was beautifully dark and moist. 

For the chocolate swiss meringue buttercream I used about 60 g chocolate per cup of buttercream. I used half semisweet and half bittersweet. The results were delicious. It tasted like a smooth and creamy chocolate milkshake! 


This might be a good time to mention the status of my KitchenAid stand mixer since swiss meringue buttercream is very 'mixer-intense'. A few tightened screws and it is running beautifully! Just for good measure though, my dad is going to be replacing a few parts and refreshing the food-grade grease. The mixer shall live on!

Next up...cupcakes, cupcakes, cupcakes! ...and maybe a few macarons. 

Sunday, November 06, 2011

A pink winter wonderland

So what do you do for a baby shower where the mom-to-be doesn't want anything too cutesy? As this baby girl is expected to arrive in January, the baby shower had an elegant snowflake theme including these cupcakes. 

Originally I thought about piping the snowflakes with royal icing on parchment for topping the cupcakes, but I thought that it might be a bit too finicky and may result in a lot of broken snowflakes and one frustrated baker. I ended up buying a snowflake plunger by PME Arts and Crafts and I was very happy with the results. I used fondant with a little tylose powder added in to make a modelling paste as it sets harder.


The cupcakes are a devils chocolate with vanilla frosting. The cupcakes are extremely light and fluffy in texture and deliciously chocolatey. I used regular Dutch-processed cocoa but would love to try using an extra dark cocoa to get an even darker/richer brown. I haven't made frosting for a while and my last baking expedition was using swiss meringue buttercream (SMB). I must say, I may be switching camps here when it comes to icing (don't tell my husband). The flavour of a sugary frosting on a cupcake is delightful and nostalgic, however for those whose palates have an equal appreciation for lovely textures, you cannot beat the SMB. The frosting ends up having a bit of a gritty texture from the icing sugar which is reduced slightly after it sits for a bit but is still detectable. I topped each pink-frosted cupcake with some course icing sugar for a snow-like effect as well as a fondant snowflake.


Now while making these 3 batches of cupcakes and 4 batches of frosting, I noticed that my KitchenAid Professional 6-quart mixer was showing signs of being on the fritz i.e. shaking more than it should at a speed of 2 and motor oil dribbling down the back. I choose not to panic. My husband and I have an agreement that if anything should ever happen to the stand mixer, we would promptly replace it. Whew. After a telephone consultation with my father (he seems to be able to fix absolutely anything), it sounds like something may be loose in the motor. I am now anxiously awaiting his arrival to see if this can be fixed before my next baking project.

Now to display these pink winter wonderland cupcakes, we (my sister-in-law and I) made a cupcake stand using three cake drums and two 4-inch high styrofoam dummies. We covered the drums in a white polk-a-dot wrapping paper, covered the edges in pink ribbon (just a smidgen too narrow for these drums unfortunately) and wrapped the dummies in pretty pink and brown paper that was also used for the invitations. I was quite happy with the overall display.


Stay tuned for an update on my KitchenAid and whether it will survive my next baking project...