Showing posts with label swiss meringue buttercream. Show all posts

Wednesday, February 18, 2015

Celebratory Layer Cakes!

I have disappeared for the last several months - almost eight months to be exact. Life has been busy and I have not had very much time for baking and blogging. I've been working, researching, organizing, purging, crocheting, singing and doing a little bit of baking here and there. I thought I would take some time to post a few of the cakes I did that I didn't get a chance to write about as I do not foresee a lot of time for blogging in the near future - more on that later in a couple of posts.

I had no idea what to call this post. What cake isn't 'celebratory'? These are two cakes that I did for family way back in May 2014. It has been so long that I'm not even 100% sure of what the flavour of the first one was. It definitely had something to do with almonds! I rarely do cakes that don't involve fondant decorations but I wanted to try some simpler but no less scrumptious looking cakes.

The first one was a Mother's Day cake - I know it doesn't look very Mother's Day-ish but really it was about the flavour. My mom doesn't like chocolate cake - although she has admitted to enjoying mocha cake with dulce de leche buttercream. I know she likes coffee flavour, so I made an almond flavoured butter cake with espresso based swiss meringue buttercream (I'm 98% sure that was the flavour) and garnished with toasted almonds. 


I was insistent that the almonds had to be sliced almonds but not blanched. Without the skin, they would just blend into the colour of the buttercream. They were a little harder to find but they look much better than blanched! 


The second cake was for my sister's birthday (same weekend!). I learned that my sister really enjoys chocolate malted milk balls and decided to run with that for a cake flavour. I wanted the cake to have the flavour of malted milk throughout and have a similar texture. 


I started out with a chocolate butter cake. For the crunchy texture found in a chocolate malted milk ball, I thought dacquoise would work well but it is a meringue that is traditionally made with nuts like hazelnuts or almonds and layered with buttercream or whipped cream and I did not want any nutty flavours overshadowing the malted milk flavour. I ended up making pseudo-dacquoise which was essentially large layers of chocolate meringue (piped in a large swirl) that I also added Ovaltine (original, not chocolate) powder to in place of some of the cocoa powder. The swiss meringue buttercream was chocolate with more Ovaltine added to it. I was worried that the Ovaltine might add a gritty texture to the smooth buttercream but it ended up being fine. The result was my cake version of a chocolate malted milk ball. It was very hard to cut into slices to serve but the flavour and texture was exactly what I wanted. 


I wanted the outside of the cake to be fun and birthday-like and you can't achieve that any better than with colourful sprinkles a-la-Sweetapolita. I originally did not plan to put the sprinkles that far up the cake but I got a little carried away - it just got higher and higher. You can never have enough sprinkles though. I decorated the top with large piped shells and chocolate malted milk balls. I must confess that I think I bought a pound of malt balls of which only 17 ended up on the actual cake and the rest ended up in my stomach - not all at once but they were gone much faster than I'd like to admit!


Monday, December 30, 2013

Peonies and piping

It was about two and a half months before I made another cake after the one that I dropped. I wasn't necessarily discouraged. It's more a lack of time. Less than a week after the cake disaster, we hopped on a plane to Europe and spent a fabulous two and a half weeks in Paris, Edinburgh, Aberlour, Castle Combe and London. Two and a half weeks was fabulous but it wasn't enough time to get through all of the gorgeous pastries that I wanted to try. After that, I really had to focus on my graduate studies. Before I knew it, it was already November and my mother's birthday. 

I wanted to take the opportunity to practice a couple of skills - flowers and piping. I had seen quite a few beautiful wedding cakes with lace-like piped pattern and wanted to give it a try. There were a lot of very similar cakes and I wondered if there was some sort of template out there or if people were just piping the design freehand. I perused a couple of cake decorating stores and could not seem to find any templates so I decided to just give it a shot on my own. The flower shape I used for the lace is a dogwood flower. I bought some very fine decorating tips - size 0 and 00 to do the intricate lines. When I got started I realized that those tips were just too small for me to work with on a cake. Since I moved a size up for the smaller tips, I unfortunately did not have tips large enough for the thicker lines and ended up just cutting a hole in the end of a disposable piping bag. It wasn't ideal but it worked. From far away, the piping looks neat enough. It was not as smooth as I would have liked close up. One of the tools that I find extremely helpful when piping royal icing or doing stringwork is this yellow spatula-pick thingy. It is absolutely fabulous for scraping off mistakes or broken lines. I don't actually know the real name for this tool but 'Boo-boo stick' seems appropriate given it's most useful function. 
I've only attempted one peony-like flower before. I like them because they still look very pretty if not terribly realistic or accurate. There are lots of tutorials online. There are also a few different styles of peony cutters. I used this one. I did the veining of each petal by hand using a gumpaste veining tool. It was tempting to purchase a silicone mold kit but they are quite expensive and at the rate I'm making cakes right now, I might make one peony a year. I think I liked the overall shape of this peony better than my previous attempt. I left it more open at the bottom so I didn't need any filler petals when I placed it on the cake. I still ended up having it quite condensed in the centre and would like to try again to make it even more open. 
The flavour of the cake was coconut and it was filled with pineapple swiss meringue buttercream. To make the coconut cake, I took my favourite vanilla cake recipe and switched out the milk for coconut milk. I also pulsed some unsweetened dried coconut in the food processor and added it to the dry ingredients. I added a bit of coconut extract to the simple syrup but found that it smelled really artificial so I made another batch of simple syrup and added only one drop of extract. It was a little better. 
For the pineapple buttercream, I used canned pineapple chunks along with the juices to make a pineapple reduction. I pureed the pineapple reduction and added it to the buttercream. It was a subtle flavour but nice. 

Monday, January 02, 2012

Orange cream macarons


So once again I had leftover swiss meringue buttercream and leftover egg whites from making swiss meringue buttercream. The most logical and delicious solution to this problem is the macaron.


I am hardly an expert in macarons. This is only my third time making them. My two other macaron adventures were maple cocoa macarons from Delicious Delicious Delicious with the exception that I preferred the flavour of maple syrup to maple extract, and chocolate peppermint macarons (using the same cocoa shell as the previous ones). Before embarking on another macaron experiment, I decided to do a bit of research again. It amazes me how much variation exists in macaron recipes and techniques. I checked numerous websites, online videos and books (including my Larousse Gastronomique, which seemed significantly different from other recipes - bake at 400ºF??). I narrowed down my recipe choices using 2 criterion 1) I do not have powdered egg whites in my pantry, therefore I excluded all recipes requiring powdered egg whites, and 2) I did not want the fuss of using an Italian meringue technique. The Italian meringue technique involves heating up sugar and water to the soft ball stage (240ºF) and then carefully pouring the hot syrup in a steady stream, into medium peak meringue with your mixer on low speed. You want to stream the hot syrup down the side of your mixing bowl to firstly avoid pouring the hot mixture in too fast and scrambling your egg whites and secondly, to avoid pouring it over your moving beater and getting hot sugar syrup in your face.

I decided on the ingredient ratios from Ms. Humble's Scatter Plot Macarons, mainly because I love that there was a very scientific/analytical method to developing this recipe.

The original ingredient list is as follows:
120 g almond meal
200 g powdered/confectioner's sugar
100 g egg whites
30-35 g granulated sugar
food colouring gel

Before I start, I wipe all of my utensils down with lemon juice to ensure that everything is grease-free. This includes the prep bowl that I'm pouring my egg whites into, my mixing bowl (you don't need it dried off as the acid in the lemon helps to whip up your egg whites), my mixer beaters and my spatula.

I used pasteurized egg whites from a carton (leftover from making buttercream), weighed them out and let them sit at room temperature for several hours. If you are separating whole eggs, 1 egg white is equivalent to about 30 g.

For the almonds, rather than using almond meal, I used whole raw almonds (including the skin). If you do not want the rustic speckled nature from the almond skin colour, then you can use blanched almonds.


I weighed 120 g of whole almonds and processed them (about 30 g at a time) with about a tablespoon of the powdered sugar. I end up sifting this mixture several times with the remaining powdered sugar to ensure that I have a finely powdered mixture.

For the granulated sugar, I weighed out 35 g and then I also processed this using my mini food-processor to resemble caster sugar which has a finer texture. I let it settle for a minute before opening the food processor.

For mixing the egg whites, as much as I absolutely adore my stand mixer, I used my hand mixer since it is a small volume mixture. Beat the egg whites until they are foamy and begin to hold a shape, and then with the mixer on low-medium speed, add the granulated/caster sugar, about 1 tablespoon at a time. Once all of the sugar is added, I beat the meringue on high (number 5, the highest setting, on my KitchenAid handheld mixer is really not all that fast) until the meringue had stiff glossy peaks. At this point you can mix in your gel colour. I chose orange since I was making orange cream macarons.

I then folded in my sifted almond and powdered sugar mixture (about 1/4 at a time) until it was all mixed in nice and evenly.

Pipe the meringue mixture onto Silpat mat or parchment-lined baking sheets (if you're using parchment, tack down the corners with a dab of your meringue mixture) in little quarter to loonie-sized rounds (I like my macarons to be a bit on the larger size). Gently tap your sheet on the counter to get rid of any piping peaks and bubbles and allow to sit at room temperature for at least 30 minutes.

I baked my macaron shells at 300ºF for 17 minutes on the middle oven rack. I had one baking sheet lined with my Silpat mat and one sheet lined with parchment. I did not find any appreciable difference between the two except that I found it much easier to remove the shells from the Silpat Mat. I placed my baking sheets on a cooling rack and allowed them to cool completely before I attempted to lift the shells.


For the filling, I used leftover vanilla swiss meringue buttercream flavoured with Whittington's Natural Orange Essence. To reconstitute leftover swiss meringue buttercream, heat about 1/3 of it for about 5-10 seconds in the microwave until warm (it may liquify slightly), add this to your cold buttercream and beat on high. You'll notice it becoming creamy fairly early on, but looking closely it may look slightly separated. Keep beating it on high until the texture is fluffy and the buttercream is smooth and shiny looking. I did not measure the amount of buttercream that I had left. I simply added a 1/4 teaspoon of flavouring at a time until I achieved the flavour intensity that I wanted.


I think this recipe will be a keeper. I look forward to trying many more flavour and colour combinations.

Saturday, November 19, 2011

Mmmacarons...

Venturing outside my comfort zone of baking cakes and cupcakes, I decided to try to make French Macarons since I had a small amount of leftover swiss meringue buttercream and quite a few leftover frozen egg whites from making pate sucree tart shells and pastry cream.


I have wanted to try these for a while but after reading various recipes, blog posts and articles, I have to admit that I was feeling a little intimidated! 

French macarons are made with egg whites, icing sugar, granulated or caster sugar (superfine), and ground almonds. The ideal macaron has a smooth domed top, and a round base (also called the foot). The popularity of the macaron has soared in the last few years (although they have been around in France since 791) and you can find a number of books dedicated solely to these chewy, melt-in-your-mouth confections. 

There are so many possible macaron flavour combinations out there and they can be filled with buttercream, jam or ganache. 

I settled on a Maple-Cocoa recipe from a blog called Delicious Delicious Delicious. With a blog title like that, how can you go wrong? The yield of this recipe was also modest and perfect for a small amount of leftover buttercream.

For the ground almonds, I processed whole almonds (including skins) using a coffee grinder with a few almonds and a little of the powdered sugar at 5-second intervals to achieve a powdery texture. I then sifted each 'batch' of almonds and powdered sugar to catch any almond chunks that weren't sufficiently ground. I threw these back in the grinder and repeated the process until all the almonds were ground to a fine enough powder. 

I then sifted the ground almonds, remaining powdered sugar and cocoa powder into a small bowl. 

The recipe calls for caster sugar which is also known as 'superfine' in North America. I don't know if the Redpath 'Special Fine' granulated is 'fine' enough so for good measure, I ground it in my mini food processor. 

Now for the egg whites. There are some firm believers that you must used aged egg whites to make macarons. From a food safety perspective, I am really not a fan of leaving egg whites at room temperature for several days. I have several jars of egg whites in my freezer from various baking expeditions. They can be safely stored in the freezer for up to 4 months. I label each jar with the number of egg whites and the date. For this recipe I used 2 frozen egg whites that I thawed in my refrigerator overnight and let them come to room temperature prior to making the macarons. 

I piped the meringue mixture onto a Silpat liner instead of parchment paper for super easy removal! This recipe suggested leaving them to sit for 30 minutes prior to baking them. I have also read that you should leave them for at least 2 hours in order to get the right texture and adequate development of the 'foot'. I was in a hurry and let them sit for 30 minutes and the 'feet' developed just fine in the oven. I baked them for about 12 minutes but I think they could have used an extra minute or two. 


I was able to easily lift them off the liner with my hands - no need for a palette knife.

They have a little texture on the inside because I used the wrong side of the Silpat mat, ha ha!


For the filling, I had leftover vanilla swiss meringue buttercream. I beat the buttercream with a small amount of maple extract. I was not satisfied with the flavour - it tasted like an artificial extract. To remedy this, I added a little pure maple syrup at a time until I was satisfied with the taste. I also had my husband approve the flavour balance as he is a maple fanatic. 


I was extremely happy with the results of my first attempt. They are not perfectly smooth - I suppose I could have avoided the little piping 'knobs' on the top by gently tapping my pan before putting them in the oven. It is recommended that you refrigerate them for 24-48 hours to achieve the proper texture and then bring them to room temperature before enjoying them. We ate them almost right away and I had no problems with the texture! Now the only question is, what flavour do I try next?

Sunday, November 13, 2011

Berries, bows, and chocolate, oh my!

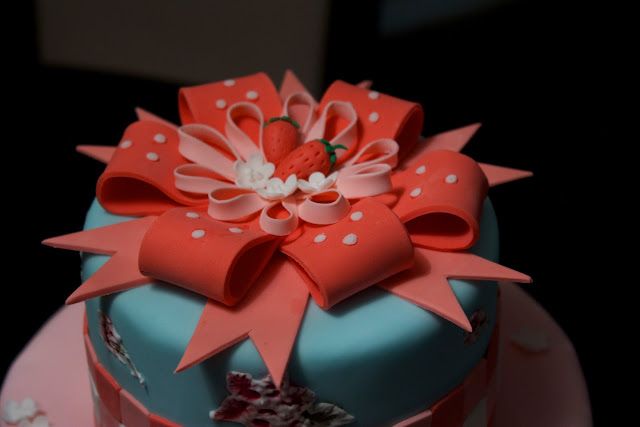
What do bows, berries and chocolate have in common? This weekend's cake!


This weekend I took a class at Bonnie Gordon College, taught by the very talented Susan Trianos. The cake used a number of techniques, some that I was familiar with and some that I wasn't. We learned to make a gingham ribbon, which is similar to creating mosaic with sugar. We also learned to make two different styles of gumpaste bows - I love bows. I may just have to stick them on all of my cakes. One of the techniques that I was not familiar with was painting combined with royal icing brush embroidery. I definitely need to work on brush embroidery! My painted flowers looked lovely from afar but were not photo-worthy close up.

The little miniature strawberries had to be my favourite - they were so simple but so cute! 


So where does the chocolate enter the picture? For this class, we had to prepare an 8-inch cake masked in swiss meringue buttercream. I recently treated myself to a bag of Cacao Barry Extra Brute cocoa powder and Barry Callebaut bittersweet chocolate callets, so I decided to make a devils foods cake filled with chocolate swiss meringue buttercream and masked in vanilla. The cocoa powder has an amazing silky texture. I don't think I can bake with anything else now. My husband wondered if we should try making hot cocoa with it. I told him that we have to use up our other regular powder first because I am certain it will be a point of no return. The cake was beautifully dark and moist. 

For the chocolate swiss meringue buttercream I used about 60 g chocolate per cup of buttercream. I used half semisweet and half bittersweet. The results were delicious. It tasted like a smooth and creamy chocolate milkshake! 


This might be a good time to mention the status of my KitchenAid stand mixer since swiss meringue buttercream is very 'mixer-intense'. A few tightened screws and it is running beautifully! Just for good measure though, my dad is going to be replacing a few parts and refreshing the food-grade grease. The mixer shall live on!

Next up...cupcakes, cupcakes, cupcakes! ...and maybe a few macarons. 

Friday, November 04, 2011

A little leftover lemon goes a long way...


When life gives you lemons (leftover lemon swiss meringue buttercream to be exact), whip up a dozen lemon cupcakes! 

So I know that I said my next post was going to be snowflake cupcakes and I'm working on those tomorrow, but having some leftover buttercream necessitated some impromptu baking of lemon cupcakes. This is the same lemon layer cake recipe from Magnolia that I love. 

Just in case you ever wondered how much zest really does add to the overall flavour of baked goods, let me just tell you that it really is key in enhancing your citrus flavour. I was busy chatting with my sister-in-law while whipping up these cupcakes and noticed after I had filled my cupcake pan, that I forgot to put in the grated lemon zest. I decided to try to evenly distribute the teaspoonful of zest among the 12 cupcakes and stir the cupcake batter carefully in the cupcake tin. The pairing of the cake and lemon swiss meringue buttercream was perfect in flavour. The cake alone without the buttercream was a little lacking in the lemon intensity that I so love compared to when I have remembered to put the zest in! 

This was my first time using swiss meringue buttercream rather than icing sugar-based frosting on cupcakes. I used a 1M tip for the swirl. It seemed to give a very pretty, ruffled effect versus my usual swirl with frosting - it may be due to using more pressure than was needed for a fluffy buttercream but I liked the results. 


Next up...snowflake cupcakes...really.

Sunday, October 30, 2011

Dim Sum Anyone?


This weekend I made a dim sum themed cake for my mother's birthday. I had originally planned to make a pretty buttercream cake with meringue flowers but my brother had a great idea for a cake featuring dim sum. 

The cake itself is the Lemon Layer Cake from The Complete Magnolia Bakery Cookbook. I initially tried to make a lemon chiffon cake from the Culinary Institute of America for something different. A chiffon cake is supposed to have a strong structure like sponge cake except that it is more moist with more flavour. It involves making an egg yolk mixture and separately whipping the egg whites with sugar and then carefully folding the egg whites into the egg yolk mixture. I found the yolk mixture to be a very odd, gooey texture. My egg whites whipped up just fine but I found it very difficult to fold the egg whites in. I must have not folded them in carefully enough as the results were very thin layers of cake that somehow baked in half the recommended time. I also found that the lemon flavour was not as prominent as the butter based cake from Magnolia, so back to my tried and true Magnolia recipe. 

I filled it with a lemon swiss meringue buttercream. I must admit that I tend to favour good old butter and icing sugar frosting (call me juvenile or unsophisticated perhaps). I decided to try a swiss meringue buttercream due to the lower sugar content (although a whole lot more butter!) This was my second time making swiss meringue buttercream. There are two potential tricky points - getting the egg white and sugar mixture nice and hot but being careful not to cook the egg whites, and adding in the butter. Apparently your buttercream can separate into a soupy mess when adding the butter. I have not had these problems yet. Apparently the soupy mess can be fixed by placing it in the fridge until cool and beating it at high speed until it comes together. I did have the problem of not paying attention and initially using my flat beater instead of my wire whip. After 10 minutes and still only getting soft peaks with my meringue, I realized my Kitchenaid attachment error. Ten more minutes with the whip attachment and it was fine! The results were very pleasant in flavour but I think I still like pairing the cake with frosting. 

The cake is covered in fondant and painted with gel paste colouring and vodka for the bamboo steamer basket. 


The har gow, siu mai and cha siu bao are all made from fondant and accented with gel paste and dusting sugar. 


Up next... Snowflake cupcakes!