Monday, February 27, 2012

Take a chance on chai!


Despite a very busy weekend, I still found a bit of time to hang out in the kitchen. I haven't had a chai latte for many, many months but a few weeks ago, I indulged in one from a very popular coffee store chain. I was instantly reminded of how much I enjoy the combination of spices in masala chai and was inspired to incorporate it into a cupcake. I haven't done a lot of tinkering with recipes in the past. I tend to find a few really good recipes that work well for me and stand by them. Since this wasn't for any particular occasion or event, I decided to 'take a chance on chai' and make my own creation. 

There are a number of spices that can be used in masala chai. The main 'base' spice is typically cardamom. From there, you can add really whatever you want: ginger, cloves, peppercorn, star anise, or cinnamon.  I decided to go with a combination of cardamom, ginger, cloves, cinnamon and nutmeg. In addition to the blend of spices, I took it a step further and steeped a Tetley Chai Tea bag (the name is really redundant being translated to "Tea Tea") in milk for 15 minutes. 


For the frosting I decided to use a cream cheese frosting because it tends to go so well with other spice cakes like carrot, pumpkin or ginger. I decided to put a hint of orange flavour in the frosting since I enjoyed it so much when I made citrus carrot cake.

The results were delicious. I felt the cupcake was moist enough though still a tad bit more dry than I would like it to be. I may have over baked them a bit since I was trying to work out the optimal timing and opened the oven several times, checking them before they were done.


I decorated these cupcakes with orange fondant gerbera daisies (or some flower creation of my own that remotely resembles a gerbera daisy).  I have posted the recipe below (for the first time ever). I hope you enjoy it!


Chai Cupcakes with Citrus Cream Cheese Frosting


Yield: 12 standard cupcakes

Ingredients:
Chai Cupcakes:
3/4 cup self-rising flour
1/2 cup all-purpose flour
3/4 teaspoon ground cardamom
3/4 teaspoon ground cinnamon
1/4 teaspoon ground ginger
1/8 teaspoon cloves
1/8 teaspoon nutmeg
1/2 cup (1 stick) unsalted butter, softened
1/2 cup granulated sugar
1/2 cup light brown sugar
2 large eggs
1/2 cup milk
1 bag "Chai" flavoured black tea
1/2 tsp vanilla extract

Citrus Cream Cheese Frosting:
1/2 cup (1 stick) unsalted butter, softened
6 oz cream cheese, softened
2 cups icing sugar, sifted
1/4 teaspoon vanilla extract
1/4 teaspoon orange essence

Method:
Cupcakes:
  1. Preheat the oven to 350 degrees. Line one 12-cup muffin tin with cupcake liners. 
  2. In a small saucepan, heat milk to a simmer, remove from heat and add tea bag. Cover allow to steep for 15 minutes. Remove tea bag, squeezing out all the milk into the pot, and allow to cool. 
  3. In a small bowl, combine flours and spices and set aside.
  4. In a large bowl or in the bowl of a stand mixer, cream the butter until smooth. Add both sugars gradually and beat until fluffy. Add the eggs, one at a time, beating well after each egg. 
  5. With the mixer on low, add the dry ingredients alternating with the milk and vanilla, beginning and ending with flour until just combined. Scrape the sides of the bowl as needed. 
  6. Fill the cupcake liners about 3/4 full. Bake for 17-20 minutes, or until a cake tester inserted into the centre of the cupcake comes out clean. 
Frosting:
  1. In a medium bowl and using an electric mixer, beat butter and cream cheese together until fluffy. 
  2. Add the icing sugar gradually and mix on low speed until smooth.
  3. Add vanilla and orange essence and mix on low until combined.
  4. Pipe frosting onto cooled cupcakes or spread onto cupcakes with a small offset spatula.

Monday, February 20, 2012

Humble Beginnings - April and May 2010

Although I technically did not take a baking break this weekend (I made plain, lemon and chocolate meringues and Chinese egg tarts), I decided to continue my "Humble Beginnings" series of posts about some of my earlier projects.

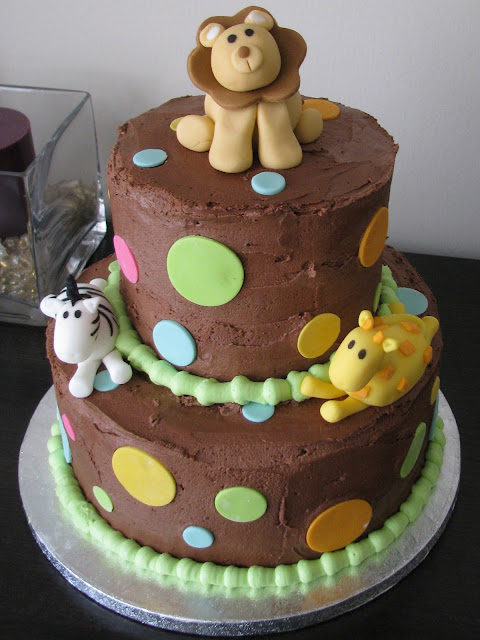
My second decorated cake was for my nephew's 1st birthday in April 2010. Although I like the cleaner look of fondant on a cake, it was requested that the cake be covered in frosting and to have chocolate frosting in order to maximize the opportunity for chocolate-covered-face photos.

I had a really difficult time getting the frosting smooth on this cake despite numerous attempts at using a spatula with hot water. I have since learned to make my frosting a bit thinner when covering a cake and to use a pastry scraper to get my sides straight. Also making a higher edge on the sides of the cake allows you to sort of tuck the edges neatly onto the top of the cake making a straighter edge. Swiss meringue buttercream is also much easier to work with but it's not as tasty for a kid's cake.


This was my second attempt at figure modelling and I think it was a bit more successful as the characters did not end up looking obese. My favourite character is the zebra. The colours and theme of the cake were chosen to coordinate with the birthday party invitations.


In May 2010, my other nephew had his 5th birthday. The birthday cake was Super Mario.


I teamed up with my sister to make all of the figures for this cake. We made a plan by taping rough paper cutouts of all the characters, bushes, stars, clouds, doors and boxes to the cake tins and took photographs for reference. My sister, having never worked with fondant before, did an amazing job making Yoshi and the Koopa Paratroopa.

My favourite character was Lakitu. Apparently my photography skills were also not as good back in the day - I think the plate is in focus rather than Lakitu.


I also thought the Goombas were pretty cute. I remember working on Mario and thinking that it wasn't going to look anything like the character but it somehow all came together, especially once I got that moustache on. I opted to skip Luigi for two reasons 1) I thought that it would be enough trying to get one of the Mario Bros. looking correct and 2) I thought it would look weird with a big Mario on the top and a smaller Luigi on the side.

I was very proud of this cake. It was the first cake that I did where the figures actually had to resemble existing characters rather than random animals which could be more forgiving.

The cake itself was vanilla with vanilla frosting.

My nephew's reaction? "Where's Luigi?". Oops...

Monday, February 13, 2012

Velvety Valentine's


My husband and I do not typically celebrate Valentine's Day. How would we celebrate? My husband could cook me a lovely dinner, but he does that every night. I could make a special treat, but I do that almost every weekend. It was really nice to celebrate when we had a long distance relationship during university - I always looked forward to coming home and finding some sort of parcel waiting for me. Now that we're married I don't feel that we need a special day to show our love and appreciation for each other. I hope that we do that every day. Is Valentine's Day a great excuse to bake something pretty? Most certainly!

I've noticed that leading up to Valentine's Day this year, there has been a flurry of red velvet-themed desserts on bakery menus and food blogs. Why is red velvet cake so popular? It could be the soft, moist crumb created from the use of buttermilk, the subtle taste of cocoa, the vibrant red colour (from food colouring) which goes so well with Valentine's themes, or the fact that it is simply a vehicle for cream cheese frosting. For me, I think it is the latter as I equally enjoy a good carrot cake or ginger cake with cream cheese frosting.


Did I really want to jump on the red velvet bandwagon for Valentine's Day? The decision to make these was based solely on the fact that this was the cupcake flavour that was requested by my co-workers. That and I'm not much of a baking anarchist.

The recipe that I used was from my Magnolia Bakery cookbook. There hasn't been a recipe from this book that I have not thoroughly enjoyed. You can find the recipe online here. Rather than pairing it with vanilla icing, I used cream cheese frosting. Yum.

To decorate them, I cut out a variety of sizes of hearts and some X's and O's from fondant. What's Valentine's without a few sweet hugs and kisses?

Sunday, February 05, 2012

Pearly Pops


Cake pops. Popular and tasty as they are, I have never had much of an interest in making them. As much as I love chocolate, I find the process of dipping things in chocolate to be both tedious and messy. I admire those who have popularized and mastered these tasty morsels of cake mixed with icing.

I had some leftover chocolate cake scraps and vanilla frosting and rather than letting these sweet commodities go to waste, I decided to make cake pops. There is a cake from Mich Turner's The Art of Cake that I have been looking forward to trying. The cake design was inspired by a Chanel clustered pearl necklace. I thought I would try this design on a smaller scale on the cake pops.

For the inside of the cake pops, I used leftover devil's food cake and mixed it with vanilla frosting. I did not measure anything. I added cake and frosting until I achieved a texture that seemed easy to work with.
I rolled the cake mixture into loonie-sized balls. I dipped the lollipop sticks in melted white chocolate wafers before sticking them into the cake balls and put them in the freezer to set.


I melted more white chocolate wafers in the microwave and re-warmed as needed throughout the dipping process. The first few cake pops cracked as the chocolate set. After a quick search on the internet, I found out that there are a few theories as to how this can happen. One theory is that this happens due to the cake pops being too cold therefore it is advised not to dip them directly from the freezer. Another theory is that if you compress the cake pops too much when rolling that they may expand once they've been warmed and dipped in chocolate causing the coating to crack. I took them out of the freezer and as they warmed to room temperature, they did not have cracks as the chocolate coating dried. The only problem was that by the time I got to the last two cake pops, they were too warm to stay securely on the lollipop stick. I suppose the best compromise would have been to keep them in the fridge. I found the chocolate a bit thick to work with, so thinned it with a few drops of grape seed oil. The chocolate cake was unfortunately too dark for a white chocolate coating which led to a grey-ish hue.


To decorate the cake pops, I made a small batch of royal icing and tinted 1/3 of the icing gold, 1/3 ivory and left 1/3 white. I piped the balls using a no. 1, 2, 3 and 4 tips. Unfortunately I had only one no. 1 tip as I think the pearls were better with smaller tips and left less of a peak. You could brush the peaks down with a damp brush but the process was already quite long and it was really just a practice run for a full-sized cake. After I finished covering the cake pops, I used gold lustre dust and a white-ish lustre dust mixed with a little vodka to paint the gold and ivory pearls. The effect was not quite what I had hoped to achieve but I think it will be easier on a larger surface to get a higher proportion of smaller-sized pearls and it will look much better on a white background then then a grey-looking background.

The most important thing was that they were delicious! I do not think that these will become a staple of my cake decorating ventures but was happy to have tried them.

Sunday, January 29, 2012

The dark side of a birthday cake...


I've taken a bit of a baking/blogging break in the last couple of weeks to get myself settled in for a productive 2012. What better way to get back in the swing of things than a Star Wars Lego cake.

This Star Wars cake - the dark side of the Force - had me singing Darth Vader's tune all week long. For added inspiration I had to revisit Volkswagen's 2011 Superbowl commercial and their more recent 2012 Superbowl teaser both of which put me in a great mood for creating and further cemented Darth's theme in my head.

The cake had a few challenges along the way but I was happy with the overall result.

My first order of business was creating Darth Vader as I anticipated the helmet might present a challenge. Do I create the face and then put a helmet around the face or do I created his head using one piece of fondant? My first attempt consisted of creating the face and then I tried to shape a helmet around his face. The result was not great. I decided to sleep on it and see if I could come up with another plan. My second attempt involved shaping the head to include the helmet and then I carefully used an X-acto knife to cut the helmet away from the face. Success! I allowed the body with cape to set for a day before attaching the head and waited another day before attaching the arms to make sure everything was secure. I made him shiny by painting him with piping gel mixed with a small amount of vodka. The details are painted on using both a silver glaze and powdered food colouring mixed with vodka.


Next were the Stormtroopers. Similar to Darth Vader, I made the bodies first and allowed them to dry before making and adhering the heads. The heads were shaped from one piece of modelling paste and details were painted on with colouring mixed with vodka as well as edible marker. It was challenging to paint small black details on white fondant and not get it all over the place. I learned that little smudges could be fixed with a little brush of vodka. I allowed the heads to dry for about a day and a half before attaching them to the bodies. The hands and the weapons were made using gum paste as it dries harder and faster meaning less chance for breakage.


The cake was chocolate devil's food cake with vanilla frosting. Now comes the real challenge of the cake. You may remember my Superman cake post from November in which I fought with a giant air bubble. I attributed this to perhaps missing a spot when moistening the cake. Some people attribute the development of giant air bubbles to a rapid change in temperature after covering a refrigerated cake and that this can be avoided by allowing your cake to come to room temperature before covering it. I must say that I thoroughly chill my swiss meringue buttercream-covered cakes prior to covering in fondant and this has never happened as a result of the refrigeration. Some say that frosting is not stable enough for fondant-covered cakes although I cannot find a good explanation as to why. Perhaps they are right but some people just prefer the taste of frosting. I think you can gather from this paragraph that the giant air bubble or rather bubbles reared their ugly bulges with this cake. If I learned anything from the Superman cake, it was to leave it be as the more you fuss with it, the bigger they seem to grow and the fondant may start to crack in places. It created somewhat of a Jabba the Hut shape to the sides of the cake which for the most part was thankfully covered by the figurines. My other problem with covering this cake was perhaps the brand of fondant. The fondant I use tends to be on the softer side which means that it may be prone to stretching after you've rolled it out. This has not caused too many issues in the past, however in making a dark coloured fondant, you have to add quite a bit of gel paste colouring and this may soften your fondant further. I always weigh and colour my fondant a few days in advance to allow the colour to set and usually the fondant firms up again. I found that this time, the fondant was just too soft and I think this may also have caused problems with getting a smooth finish around the cake as I had to repeatedly re-trim the bottom of the cake. I believe that I am going to be giving another brand a try for covering cakes but may still use my current brand for figure modelling since it still works quite well when mixed with a little Tylose powder. If after switching brands, I continue to experience these frustrations with frosting-covered cakes, I may use frosting only as a filling and continue to mask and crumb coat my cakes with buttercream - it's safer for the cake and my sanity.

May the frosting be with you.