Sunday, June 17, 2012

Superhero Cake

I made this cake a few weeks ago but did not write about it right away with the intention of writing about it during a baking break. Why the baking break? We were preparing our home for sale and I was reluctantly packing away my stand mixer for the showings. 
Turns out that one and a half weeks of having your home on the market is very tiring and rather stressful. It felt like an eternity and I was not in the best frame of mind for writing about cakes. Our home is now sold, and we are in the midst of planning the renovations for our new home (new kitchen yay!!!).


This was the second last cake of birthday season in my family. My nephew requested a superhero cake and my sister sent me a few photo ideas of what he liked. We kept the cake design simple since I was in the process of packing cake-making supplies away.  

I ended up rolling the fondant a bit thinner than I usually like to because I really purchased just enough fondant to get the cake done. I didn't want to have any leftover fondant since I would not have a good place to store it during the showings. 

I used modelling paste and silicone moulds to make the pearl border. 


For the logos, I printed them onto card stock and cut out the templates using an x-acto knife. I rolled modelling paste very thin and cut out the logos using the template and an x-acto knife. I smoothed the edges using a dog bone gumpaste tool.

I piped the spiderman web using black royal icing. Ideally I would have measured and marked the board to ensure the web was even as it's really difficult to correct mistakes when you are using black icing. I decided to free-hand it and it turned out just fine. I guess the stringwork class that I completed, but did not really enjoy, came in handy.


The cake was a simple vanilla cake with vanilla swiss meringue buttercream.


I haven't unpacked my stand mixer yet since selling but I hope to be back up to baking and blogging soon. I will sadly be taking another baking break toward the end of the summer as we move into our new home. The kitchen likely won't be finished by the time we move and I am not sure I'm up for the challenge of figuring out what I can come up with using only a wooden spoon and a microwave!

Monday, May 21, 2012

A Pretty Blue Birthday


This cake was a variation on Mich Turner's 'Art Nouveau' cake from the book The Art of The Cake. I loved the simplicity of the design and thought that it would be a lovely cake for my sister's birthday. 
Instead of the simple 2 layer flower on the cake in the book, I decided to try to make a more full and ruffled bloom. I used modelling paste to make this flower instead of gumpaste as the modelling paste takes a little longer to dry and gave me more time to manipulate the petals. I discovered in this process that I do not like my plastic ball tool. It actually has a seam in it that catches the modelling paste on occasion and tears or comes close to tearing the petals. I think that investing in a metal ball tool would be worthwhile for future flower-making attempts. The centre of the flower is filled with little balls of modelling paste lightly brushed with lustre dust. 

The swirly design is piped on with royal icing. The book offers a template however I just freehanded the design. I did use my inscriber tool to lightly mark where I wanted the swirls. You don't want to be too heavy handed with this as your royal icing 'strings' may not fall exactly where you want them to, especially when making big swooping swirls on a larger cake. Speaking of larger cakes, this cake is shown as a cute little 4-inch cake in the book. If you want to do a larger cake (this one is an 8-inch cake), be prepared to have a lot of patience piping on the little accent dots. 

My nephew thought that the design on this cake looked like an octopus. I guess at age 7, you are more likely to associated swirls with an octopus rather than art nouveau. 


The cake itself is Sweetapolita's Vanilla Bean Latte Layer Cake with a few minor variations in the buttercream. My swiss meringue buttercream recipe makes about 8 cups of buttercream so I used 2 vanilla beans in addition to a teaspoon of vanilla extract, and increased the instant espresso to 1 tablespoon + 1 teaspoon. I love the look of buttercream speckled with vanilla bean seeds. 

The cake flavour was nice although I felt the texture was a bit dense. It may be that it is the intended texture of the cake or perhaps I over mixed the batter, although the cake layers rose quite well in the oven.  
The flavour of the buttercream was wonderful and it gave me a great idea for another May birthday cake. Stay tuned! 


Tuesday, May 15, 2012

'Ferrero Rocher' Cake Pops


I have a love-hate relationship with cake pops. I love the idea of them, I love thinking of flavours and designs, and I love eating them. I don't love the process. Perhaps since I've only made them twice, I haven't optimized the timing of everything as I've almost done with making cakes. Perhaps it is because I was unable to account for the unplanned event of purchasing a house this week, which changed my schedule and resulted in dipping chilled morsels of cake into chocolate at 2 in the morning. I have to admit, after a bit of sleep, I did love the end result, so I haven't written cake pops off entirely.


These cake pops were for the dessert portion of a dinner party. I wanted them to be pretty and shimmery like the pearly cake pops but simpler in execution since I was making 40 of them.
The flavour of the cake pops was inspired by the candy Ferrero Rocher. I used my favourite chocolate cake recipe mixed with Nutella frosting from Sweetapolita. I covered these in white chocolate melts.

Last time around, I discovered that if I dipped the cake pops in warmed chocolate right from the freezer, it resulted in cracking of the chocolate as the cake pop expanded and it warmed to room temperature. This time I dipped them directly from the fridge. I still had an issue with a few of them cracking and adjusted my technique to take out several cake pops from the fridge at a time. If you leave them at room temperature for too long before you get to them, they get too soft and you end up getting crumbs in your white chocolate. You also risk the chance of the cake pop falling off of the stick.


For the garnish, I wanted to use hazelnuts to enhance the Ferrero Rocher/Nutella taste. I found that it was very difficult (impossible) to find blanched hazelnuts. I learned that you can easily blanch/peel hazelnuts by placing them in boiling water with baking soda added (like when you make pretzels!). You boil them for about 3 minutes and then place them in a bowl of ice cold water.  The skins slide off fairly easily in the cold water. I then placed them on a paper towel to dry. Once dried, I chopped them in a food processor and toasted them. To add shimmer, I tossed the toasted nut pieces in gold lustre dust. I also sprinkled the cake pops with edible gold stars.

When I finished at 2:30 am, I found that I wasn't really satisfied with how they turned out. After a bit a sleep and with the added packaging, I thought they turned out to be the perfect treat for the end of a dinner party. During this process, I told my husband to never allow me to make cake pops again. After reviewing the photos and eating a few, I can't say that I am so resolved to avoid them entirely. I just love them too much.


Sunday, April 29, 2012

Caaaaaaake

Zombies have taken over birthday season. 


I am always looking around for inspiration for cake designs - books, stationary, tableware, textiles, you name it. For my birthday, I had initially intended to make a feminine, elegant and pretty cake. My husband and I have birthdays that are 1 week apart, so we decided to have one joined get together. Since we were doing a joint party, I decided that the cake should reflect the two of us. Enter...zombies? We have a bit of a thing for graphic tees. One of my favourite designs that my husband has is called 'Acquired Taste' by Patrick Spens.  I recently saw my husband wearing that shirt and thought to myself, 'that would make a really cute cake'. It features a group of zombies longing for a brain meal, while one loner zombie is left behind just wishing he could have a sandwich.


I enjoyed making these zombies, especially because the less 'perfect', the better and more zombie-like they looked. The characters and clothing are made with modelling paste. The 'dirt' is black petal dust mixed with a little confectioner's sugar and the little hair spikes are made from gumpaste.


In order to support the characters in standing and walking positions on the cake, I allowed them to dry with a long piece of spaghetti inserted into one or both legs and then inserted this into the cake. I typically try not to use anything inedible in my cakes, but if I had been transporting this cake, I probably would have used wooden skewers instead. 


Rather than making one lonesome zombie wishing for a sandwich, I made zombie versions of my husband and I, sharing our birthday cake. I initially designed them to be holding hands, however I did not have a large enough cake board on hand, so their wasn't enough room to have them holding hands with the cake in front. I used grosgrain ribbon for the cake board instead of satin as I didn't think a shiny satin would really go with a zombie cake.


The brain is made from Rice Krispies and covered in modelling paste. For the cake, I made a mocha cake with dulce de leche swiss meringue buttercream which was the flavour of our wedding cake. The cake recipe was from Martha Stewart Weddings. I halved the recipe and this was enough for an 3-layer 8-inch cake, and a 2-layer 5 inch cake (I made a shorter top tier so that the brain was within reach of the zombies). I had a little leftover batter and this was enough for 12 mini cupcakes. For the buttercream, I used about 1/2 cup of dulce de leche and beat this into about 8 cups of vanilla swiss meringue buttercream. The cake is covered in chocolate fondant. 


We had a lovely birthday get-together with our families. They seemed to enjoy the cake theme as did my oldest nephew - he took the brain home (I know which side he's on....).

Saturday, April 21, 2012

Care Bears countdown to a 3rd birthday

Birthday season continues with a Care Bear themed cake for my nephew's 3rd birthday.


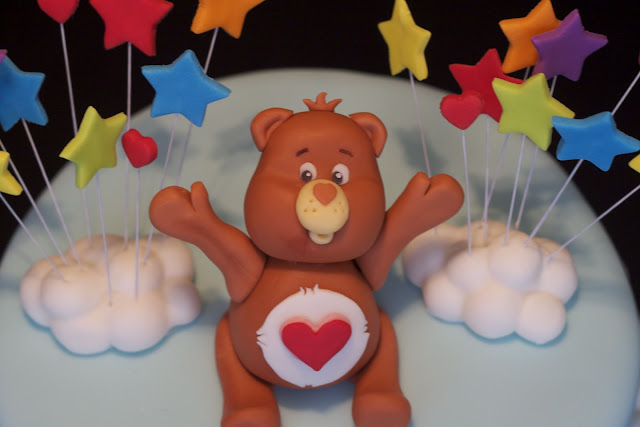
My sister-in-law did not really have a theme for my nephew's party but thought that she would somehow work in the Care Bears since he loves them. She gave me a list of care bears that he would recognize. I chose to make Tenderheart Bear for the top of the cake.


I decided to fashion his arms in a cheery 'Happy Birthday!' type pose, however, with the direction of the eyebrows my husband felt that it looked more like he was being held up. He suggested that I make some bandit bears to accessorize the cake. Unfortunately for my husband, I didn't think the bandits would fit the birthday theme and I also didn't have time to make any extra bears.


What are the Care Bears without the abundance of clouds and stars and rainbows a-la-Care-a-lot? I framed Tenderheart Bear with rainbow-coloured stars dotted with a couple of hearts. I surrounded the border of the cake with various sizes of clouds made from fondant. It took quite a bit of fondant to make the clouds and it made the cake quite a bit heavier than a typical 9-inch cake.


The most fun part of the cake was the inside. It was difficult to get a good picture of it at the party and it's much neater for pictures if you cut a cold cake (not so good for eating though), but you can get the idea.
It was 6 thin layers of vanilla cake filled with lemon swiss-meringue buttercream. I got the idea from Sweetapolita's Rainbow Doodle Birthday Cake and thought that it would be perfect for a Care Bear Cake. I used the cake recipe from the website but made my swiss meringue buttercream using fresh lemon juice and a few drops of lemon oil versus lemon extract. The layers of buttercream are almost thicker than the cake layers! The kids (and adults) loved the bright colours of the cake. 


While making this cake, my husband put on a Care Bears movie for me to watch on my iPad. It brought back many happy childhood memories. This is such a wonderfully cheerful cake for a 3rd birthday and I hope that my nephew enjoyed it!