Saturday, May 18, 2013

A despicably pretty minion cake

This cake has a bit of a history. Since seeing the movie Despicable Me, I really wanted to make a minion cake because they are just so darn cute and I love cute things. My youngest nephew's birthday is in December and last summer my sister tried to show him multiple Despicable Me videos to convince him that he wanted a minion cake for his birthday. He ended up wanting a Michael Jackson Thriller werewolf cake, which he got. He is already planning his cake for next year - something to do withe Harry Potter and Spiderman. He said to me "Aunt 'Deece' (which is how he says my name) you can have funny little yellow guy for your birthday." I didn't do a decorated cake for my birthday or my husband's birthday this year - I did an apple cake with butterscotch cream cheese frosting and a banana chocolate chip toffee cake with bourbon frosting and chocolate ganache. They were delicious but did not fill the 'funny little yellow guy' quota. Someone in my family was going to get a minion cake. It was only a matter of time. Next family birthday - my sister. I thought it would be a great cake for my sister as a reminder that she really needs to work on her cake idea brainwashing skills with her kids. 
The cake design in itself was not overly complicated. It's basically a yellow cylinder. It did require some structural support though and some cake carving skills to get a symmetrical domed top. The cake was six 6-inch layers of almond butter cake filled with strawberry swiss meringue buttercream. I used a plastic centre dowel when stacking the cakes to ensure that it wasn't a leaning minion in the end. Once the cake was all stacked, filled and crumb coated, it measured about 8 inches tall. 
The main challenge of the cake was covering such a tall and narrow cake with fondant without tearing and creasing or pleating. I am not sure what the proper technique for covering a tall cake is but what I did managed to work well. I rolled out my circle of fondant a couple of inches smaller than what it should have been for a normal cake knowing that the fondant was going to stretch quite a bit as I smoothed the fondant against the cake to get out any pleats or folds. The other part is that knowing it was going to stretch and therefore be susceptible to tearing, I rolled my fondant thicker than usual. Normally I roll my fondant about 3/8" thick or slightly thinner and this time I rolled my fondant 1/4" thick. The last component: you have to work very fast! As the fondant dries (which depending on which brand you use can be very fast) it becomes more difficult to smooth out any folds without leaving marks on the cake. I ended up with one very small tear at the very bottom of the cake which wasn't such a big deal since it was being covered with a dress. 


I looked at several pictures of minions to decide what facial expression I wanted. They also vary a little bit in hairstyles. I went with a little bit of hair scattered evenly over the top of the head. The hair was made from gumpaste. I let it dry overnight and then placed it into the scalp right after covering the cake with fondant while the fondant was still very soft. I made quite a few extra pieces of hair accounting for possible breakage. I used a daisy cutter/plunger for the little hair accessory.
For the mouth I used a ball tool to indent the shape of the mouth while the fondant was still soft. This resulted in cleaner edge than if I had cut out the shape of the mouth. I then spread a very thin strip of purple fondant in the indented area and filled it with uneven looking teeth. 

Now I know that a pink dress is not the typical outfit for a minion - they are typically wearing blue overalls unless they are in disguise trying to get a stuffed toy unicorn from a toy store, or cleaning as a French maid. I decided that seeing as how the cake was for my sister and it was also Mother's Day weekend, I would do something spring-like and feminine. I wanted to keep the dress in a similar style to the overalls they wear. I first wrapped a skirt around the minion creating folds for pleats as I went around the body. I cut out a rectangular piece for the front and then strips for the waistband. I used a stitching tool to create the look of seams on the dress. 
Since the cake was celebrating my sister's birthday, I thought it was only appropriate to have the minion celebrating with a cupcake. It was also a very logical place to stick a birthday candle.
My youngest nephew spent a lot of time staring at this cake. My sister said to him, "See, don't you want a little funny yellow guy for your birthday?" My nephew replies, "Yes, and I want Harry Potter, and Spider Man...." I think we should just quit while we're ahead and stop asking him about his cake for next December. If we don't, I'm going to end up making ten different cakes for one birthday.

I had a great time making this cake. People often ask if it is heartbreaking to cut into a cake that I've spent so many hours making and my response is typically 'no'. This cake was not the most time consuming cake that I've done but I think it was the hardest one to cut into. I wanted to keep it, like a stuffed toy. Thank goodness for a blog to document the memories!

Thursday, April 25, 2013

A collage of cupcakes

My husband recently mentioned to me that my life is a little like a sitcom. I say 'yes' to everything and then hope it all comes together. I somehow manage to jump from adventure to adventure and it all works out in the end. This is probably not good for the sanity of myself nor those around me and is generally a flawed philosophy for life. 
I also can't keep things simple. I think 'Fifty cupcakes? A variety of themes? No problem. I'll do a few 3-dimensional decorations and the rest will be simple 2-dimensional decorations. Tah dah!' And then as I start to make things, I think to myself, '2-dimensional is no fun! I want to make cuter things!' And then halfway through the week, I have bags under my eyes, I clutch my decoration to-do list on the subway and revise my plan of attack on my way home from work each day. I think to myself, ' I need a baking break' and then I somehow finish the cupcakes, I am thrilled with them and think 'wow, I should do this again soon!'. This is the story of my life. Actually below is the story of someone else's life - in cupcake form! 


I was told a few things about the guest of honour: He likes a particular business organization, cycling, tools and food. For the business aspect, I did a couple of books titled 'The Art of Business' and a couple of business shirts and ties. I made some simple bicycles for the cycling.


I think I had the most fun making the tools and the food. I had done several of the tools before when making construction-themed cupcakes. This time I also made hand saws, wrench and nuts, and screwdrivers in addition to the drill, measuring tape, square and pencil, and my favourite, the X-acto knife. 


I tried to make a variety of foods to go on the cupcakes. These toppers involved a lot of different colours and a lot of small details which meant a lot of work for my finger muscles! On a couple of mornings, I was convinced that I was developing arthritis in my hands. 


No birthday would be complete without cake (or I suppose cupcakes in this case) and I couldn't resist putting a piece of a cake on top of cake. I have an appreciation for redundancy. My husband would call it recursion. Geek. 


Following along with sweet foods, I made a few little donuts with sprinkles. Who doesn't love desserts with sprinkles? Doesn't it make you feel happy, young and carefree? I felt slightly carefree while making these donuts, and then I looked at my decorating to do list and it brought me back to reality. 


I made quite a few fast food items including hot dogs, hamburger and fries, pizza and fish and chips. The fish and chips was one of my favourites and I included the peas in a ramekin (as they do at our favourite pub) which I usually push to the side because I hate peas. I've really tried to like them. I even have a t-shirt that says 'Give peas a chance'. I'll stick with the fondant ones, thank you. 

I was also happy with how the hamburger turned out. This one had lettuce, cheddar cheese and tomato slices. I also made little fondant sesame seeds. 
I included some stereotypical 'guy' foods like barbecue stuff and steak. I included peas with the steak. I don't know if that's a real thing. I suppose the healthcare professional side of me was thinking, 'That's a really big piece of meat. It needs some vegetables and fries don't count!'


My other favourite food (in true form and fondant form) is sushi and maki. This maki is made with fondant cucumber, crab, avocado and rice. Each rice grain was rolled by hand to taper the ends (because I have an abundance of extra time OCD). 
Group shot! Although there were a few distinct themes for this cupcake collage, overall they worked well together. The cupcake flavours were vanilla/vanilla, vanilla/chocolate, chocolate/chocolate, chocolate/vanilla and red velvet with cream cheese frosting. 

Okay, one more group shot. I couldn't decide which photo I liked better.
Next cake project will be something simple but delicious! We'll see if it's blog worthy and if I'm able to get photos before it's gobbled up.

Monday, April 01, 2013

Welcoming a little peanut

I have no idea where the past few weeks went. Spring is fast approaching and while I am very excited about spring and summer (we kind of missed it last year with buying a house and renovating) I feel like time is flying a bit too quickly. Before I know it, birthday season in my family will be here. 
I'm also seeing deadlines quickly approaching for goals that I've set for myself for getting my thesis done. Scary. 

Carrying on with a baby theme, my last baking project was for a baby shower honouring my friend's sister. The theme was elephants and the colour palette was grey and yellow. 

I wanted the elephants on the cake to match the invitation, so in order to make a mommy and baby elephant, I photocopied the invitation onto card stock to use as a template for the gumpaste. One of the challenges with 2-dimensional elephants was figuring out the most stable way to insert these into the cake and ensure they would stay put during a car trip. Initially, I carefully inserted floral wire into each of the legs. I found that I could see the floral wire through the elephants and it did not have as clean of a look as I would have liked. Instead, I recut the elephants and made long and tapered legs that I could stick into the cake. After covering the cake in fondant, I lightly indented where each of the legs would go. After the fondant set and I had the cakes stacked, I made slits for the legs, filled them with a bit of royal icing for added stability and inserted the elephants. The balloon was made with gumpaste and floral wire. This was also secured with a bit of royal icing. I didn't think these elephants were going anywhere, but just in case, I made a few backup elephants for the car ride -- understudies, if you will.
I must say, stripes are not my favourite (translation: not the easiest) thing to do with cakes, especially with 3 alternating colours. My brain is just too tired in the evenings after work to mathematically figure out how many stripes I need to ensure that the colour pattern is continuous and I don't end up with two of the same coloured stripes side by side and how far apart to space said stripes. My math skills seem to be great these days (I really think that it was sheer luck) as the repeating colour pattern worked out perfectly!
I love polk-a-dots and I think it went nicely with the stripes on the bottom tier. I did a pearl border around the base of each tier to finish it off. 
The cake was chocolate with dulce de leche buttercream. I am still using Satin Ice for my fondant of choice. I find that it dries a bit too quickly and that you need to work really fast when covering the cakes to avoid an elephant skin look (would have been ok in this case!) but I love that it does not stretch as much when you are picking up the fondant and it dries to a nice hard finish which I think gives a cleaner look to the cakes. I'll have to see how it behaves in the warmer/more humid weather. 
I was really happy with how this cake turned out and really loved the colour combination of grey and yellow. I also loved the simplicity of the 2-dimensional elephants. My friend did an amazing job putting together the baby shower. Everything was so beautifully coordinated and I was happy that one of my cakes was a part of it.
Now let the countdown to birthday season begin. Will I reign myself in and keep things simple? We shall see.

Sunday, March 03, 2013

Bright baby shower cupcakes

My baking projects and subsequently my blog posts are becoming a tad few and far between. As much as I would like to spend more time on baking and blogging, I am learning the importance of finding balance in my life. Baking is my hobby - 'an activity done in one's leisure time for pleasure'. I have realized that when it no longer fits into 'leisure time', the 'pleasure' aspect of it can become diminished. I am always happy with the outcome of the projects I choose and never have regrets for taking on a project at the end, however sometimes the process in itself may not be so fun and that defeats the purpose of Sweet-D Cakes. 

These cupcakes were an example of a nice light, bright and fun project. People frequently ask me if cupcakes are easier or less time consuming than putting together a fondant-covered cake. I can't say that they are less time consuming because it can take hours to put together many toppers each containing small details that are in themselves time consuming. The benefits over doing a full cake are they tend to be less messy - no cake crumbs from trimming, levelling or torting cakes and I typically use frosting rather than swiss meringue buttercream for my cupcakes which is faster to make and makes yummier leftovers to eat with a spoon later on. The cons of cupcakes is that often they can be more time consuming due to a large number of small details versus fewer cake topper components that can be made up to 2 weeks in advance. Also, you cannot really bake the cupcakes ahead of time and maintain good quality control as they will dry out much quicker than a cake as there is more surface area and with a cake and you can seal in moisture when you cover it with buttercream and fondant.


For these cupcakes, I wanted a little more oomph than the typical pastel colours associated with babies, so I used a hint of electric/bright coloured gel pastes: fuschia + electric pink, lime green, turquoise and egg yellow (okay, egg yellow is not that bright but I didn't want them to be blindingly bright). I think that I could have used a bit more lime green in the scalloped circles as the green is not very discernable from the yellow.

All of the decorations are made from a mixture of fondant and gum paste in about a 3:2 ratio.
The little booties were very simple to make and very cute. As they were simple and plain, I added a couple tiny little flowers to each set.


For the baby faces, I rounded the edge of each fondant circle, added a hat with a little pom-pom and created a ribbed knit effect using a quilting tool. I dusted the cheeks with a bit of petal dust to add a bit of baby rosiness.


The cupcakes were red velvet with cream cheese frosting piped on with a large star tip. I used brown cupcake paper rather than white so that the red did not obviously clash with the cupcake toppers.
The result was a neutral base for bright and cheerful baby-themed decorations.


Wednesday, February 06, 2013

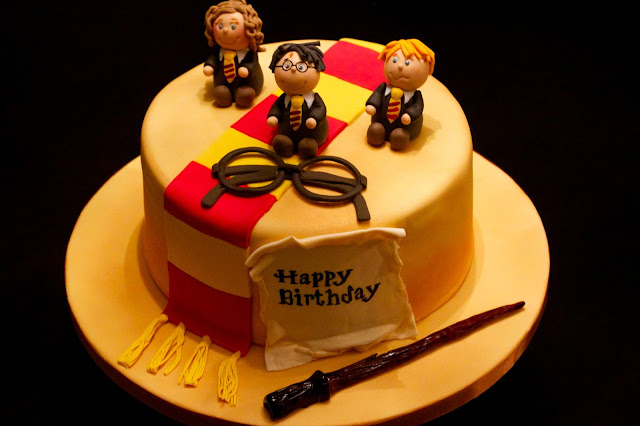
A happy Harry Potter birthday

So after Christmas and the werewolf cake, I decided I was going to take it easy for a bit and just focus on some simpler things. That didn't last very long, in part because I have a very difficult time saying 'no' and I really like Harry Potter. That is how I ended up doing Harry Potter cupcakes and a cake in the past week. 
I kept the cupcakes simple as it was a very busy week. I used modelling paste (half fondant, half gumpaste) for the decorations. The striped scarf was made by 'gluing' red strips to a piece of yellow modelling paste and then running it through a pasta machine. 
I made two little cauldrons and filled them with bright green frosting so that two of the cupcakes could hold candles. I also did Harry faces, lighting bolts and glasses although I think that without arms the glasses look a little like quidditch goggles.


Next was the cake. I wanted again to keep the design simple and cute since it was for a children's party.
The characters are made from modelling paste. The face details are using edible marker and the stripes on the ties painted on using gel paste mixed with a bit of vodka.


To make the hair, I used an extruder. For Hermione I twisted each strand for the curls and attached using edible sugar glue. The modelling paste dried very quickly so I didn't have to worry about the curls coming undone after attaching them.


For Ron, I made him looking a little worried as that is typically how he was throughout the series. When I was attaching the hair, I got a little extra sugar glue on the side of his forehead. I didn't bother trying to clean it off as it actually worked by looking like a little bit of perspiration (although I suppose that it's not very appetizing for a cake, but I've done worse!)


My husband felt that from a side profile, Ron looked like he was mad at Harry Potter. This seemed to work, especially considering the last couple of books. Maybe Ron is just tired of Harry getting all of the attention or he has a horcrux hidden somewhere on him.


The wand was made using gumpaste. I used a few different shades of brown twisted together to make a wood-like colour and used dresden tool to make a wood grain effect. I then painted it with brown gel paste mixed with vodka.

Other details for the cake included gumpaste glasses. This one took two attempts as I broke the first pair.

The scarf was made from fondant. I roughly measured each piece, lined them up alternating the colours and then cut along the sides so it all looked like one piece. Then I placed it on the cake with sugar glue and carefully trimmed any pieces that had stretched when transferring to the cake.


I made a parchment scroll out of modelling paste on which to write 'Happy Birthday'. I did not have time to cut out letters in the Harry Potter font, so I freehanded it using edible marker. It actually didn't turn out too bad considering I left this to the last task and with the time crunch, my hand was shaking.


Unfortunately with time limitations, my photography was not optimal. I really should have  used a flash. To give an antique look to the cake, I  used a large brush to dust the cake, the board and the edges of the parchment with a mix of brown petal dust, gold and apricot lustre dust. It did not really show up in the pictures. Perhaps I should have used a greater proportion of brown petal dust, or just used a flash. You'll just have to trust me that it looked a bit antique.
I really enjoyed making this cake but I have to say, I am tired! I really mean it this time, it's time for some simpler projects!